I love when the air starts to change and fall starts to arrive. With it’s crisp, cool air and the beginning of wearing tall boots and chunky sweaters. It’s the time for checking all of my kids’ winter clothing and seeing what needs to be replaced.
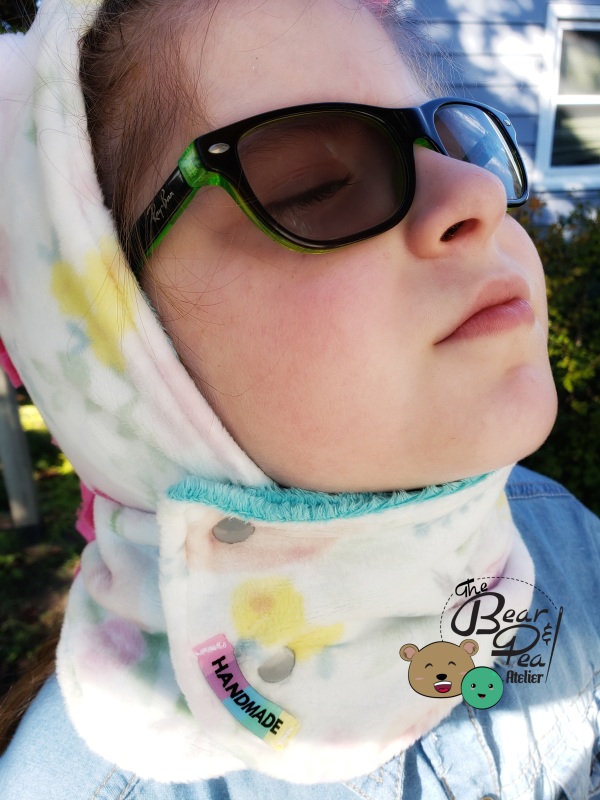
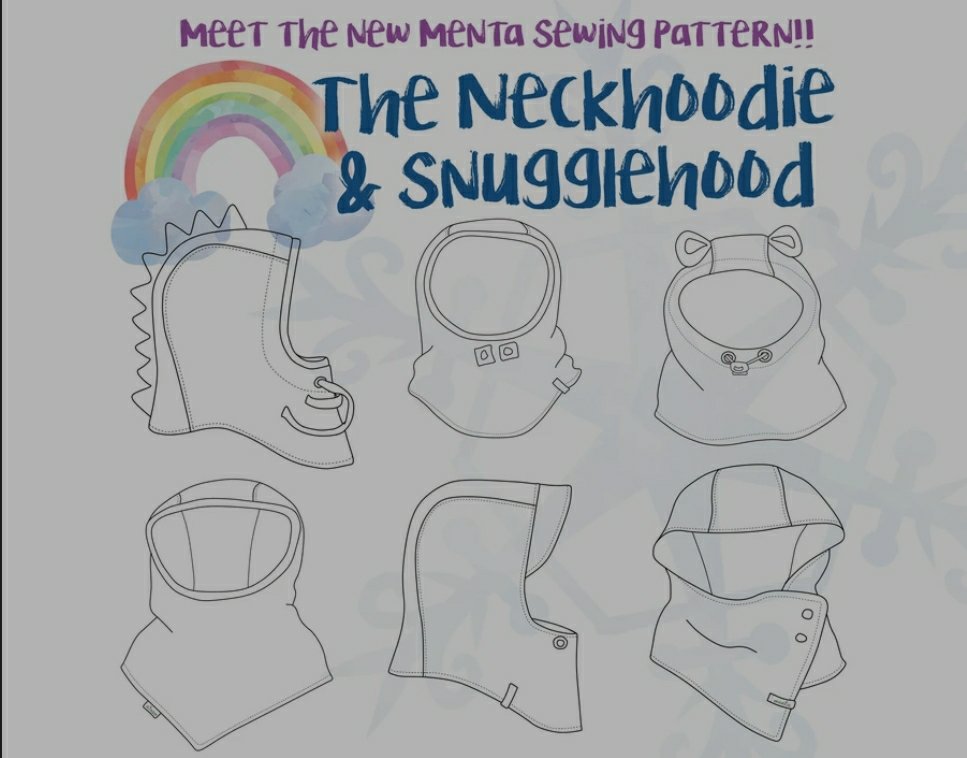
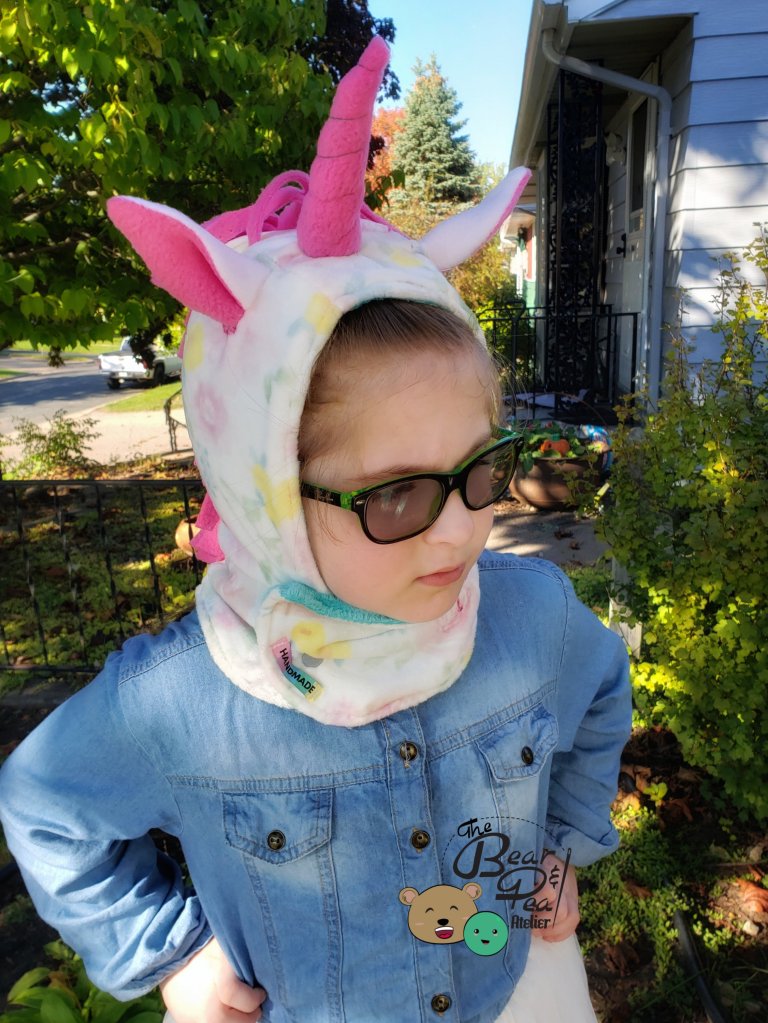
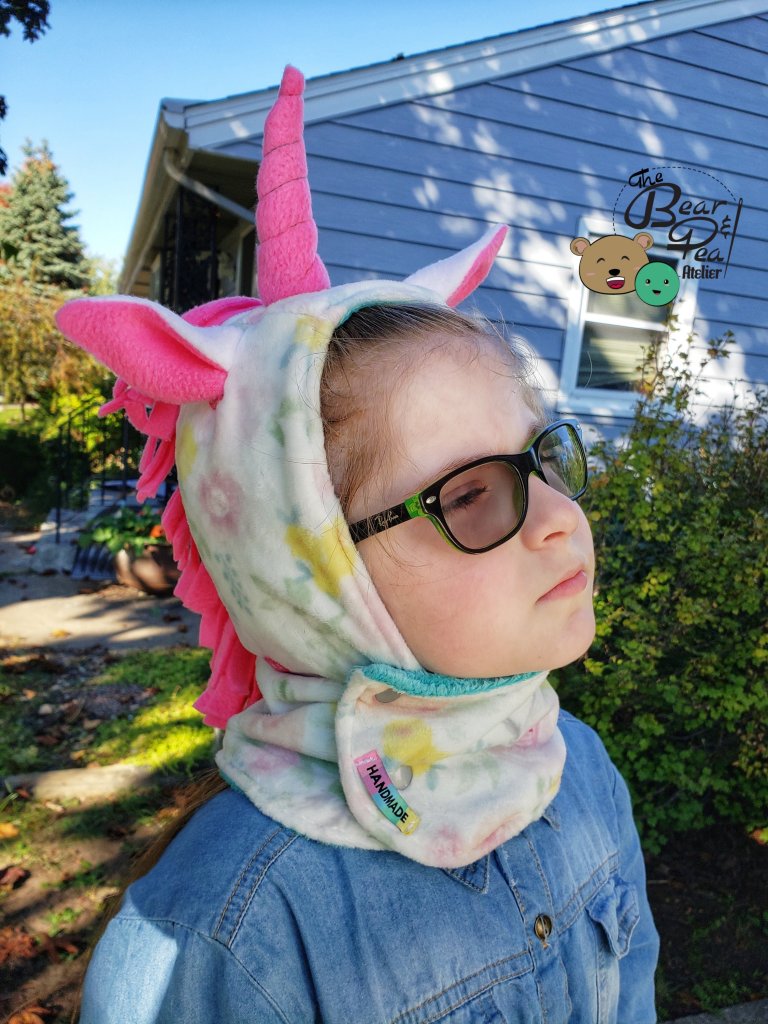
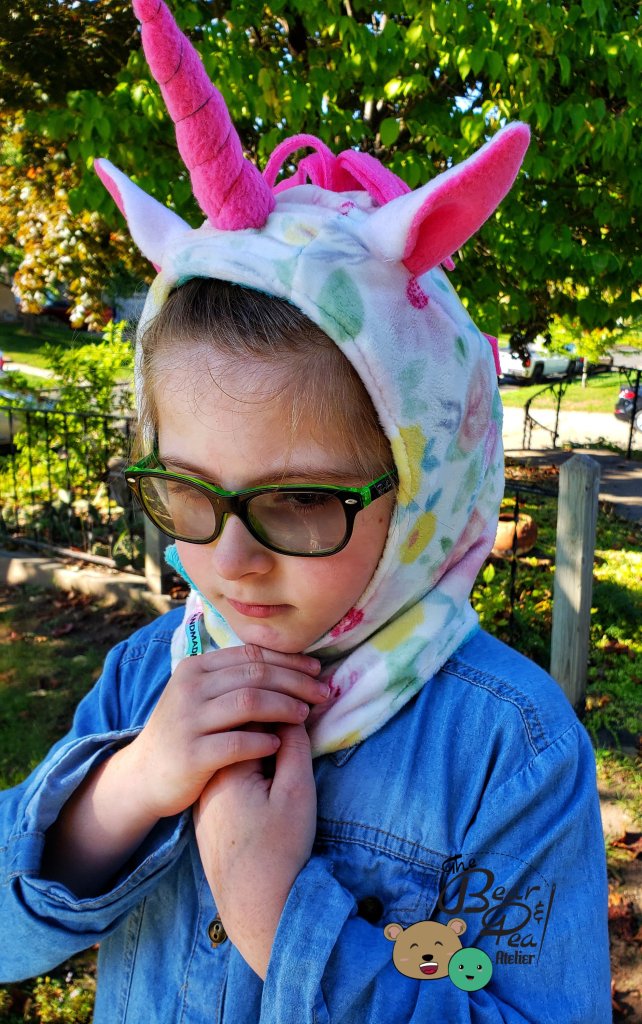
My 7yo is what I like to call a slow grower, she wears a size 5 in most clothing and is still in toddler shoes, so we check her gear each year waiting to see if we need to replace them and for the first time in 3 years we need new hats and gloves! I was very excited when Sew PDF Patterns decided to run a sbowcase featuring a super snuggly winter hat with a unicorn add on, which suits Sweet Pea so well!
If you follow the blog, you know that I sewed the Petite Pan and Racing Shorts in knit fabric earlier this week (you can findthat post here.) After talking to Sweet Pea she decided that she wanted the shorts tighter and the top attached to shirts for a fun swimsuit cover up or outfit for riding her bike.
Since this is an add on post hacking previous patterns (linked above) I’m just going to cover the change in construction.
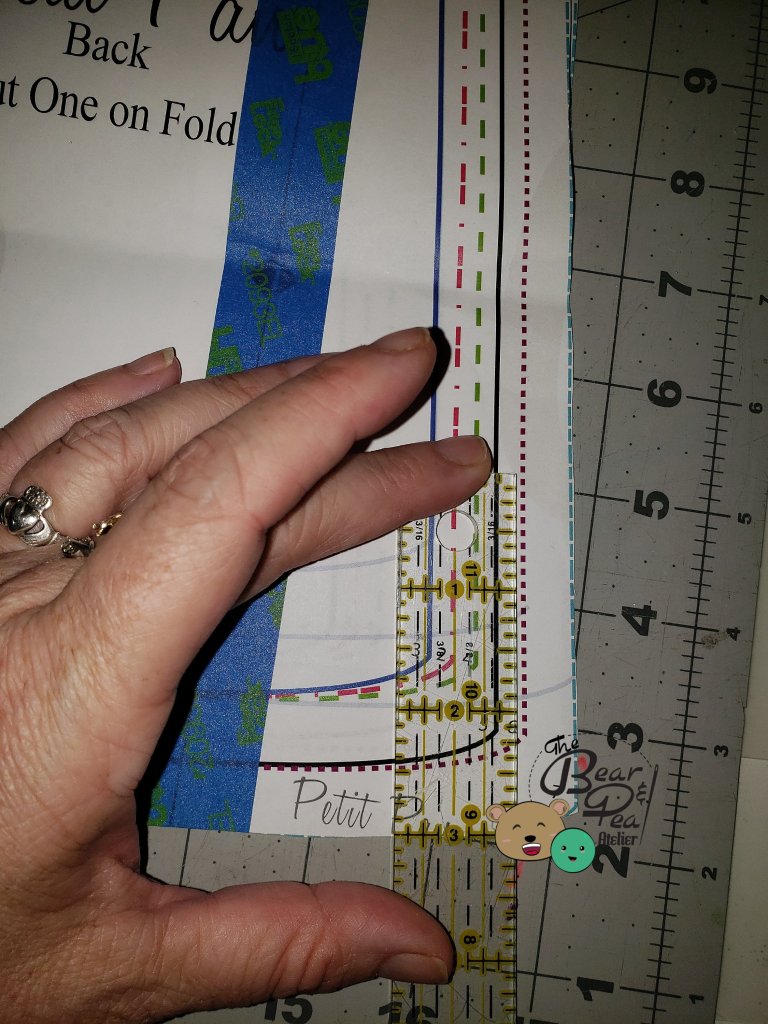
I started with taking 3 inches off the length of the Petite Pan, though once made I realized I could have probably left the original length to provide lots of room for Sweet Pea’s longer torso.
Part of a pattern piece being measured off 3 inches to shorten it.
After shortening it appropriately, I constructed the Petite Pan the same as the instructions then added a gathering stitch to the bottom of the hemline. Next I constructed the shorts the same as the instructions. I did an 18 month sizing as Sweet Pea specifically indicated she wanted the shorts much more fitted.
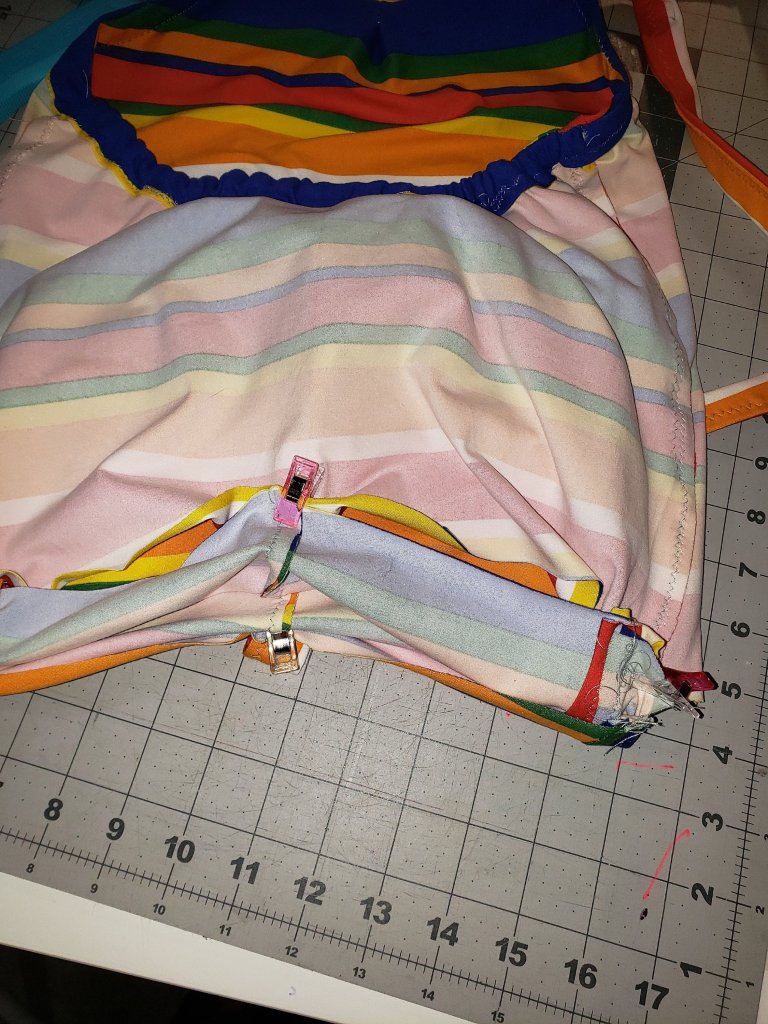
Image of the top clipped to the shorts.
Once I sewed the top to the shorts, I added elastic to the hem allowance to create the waistline.
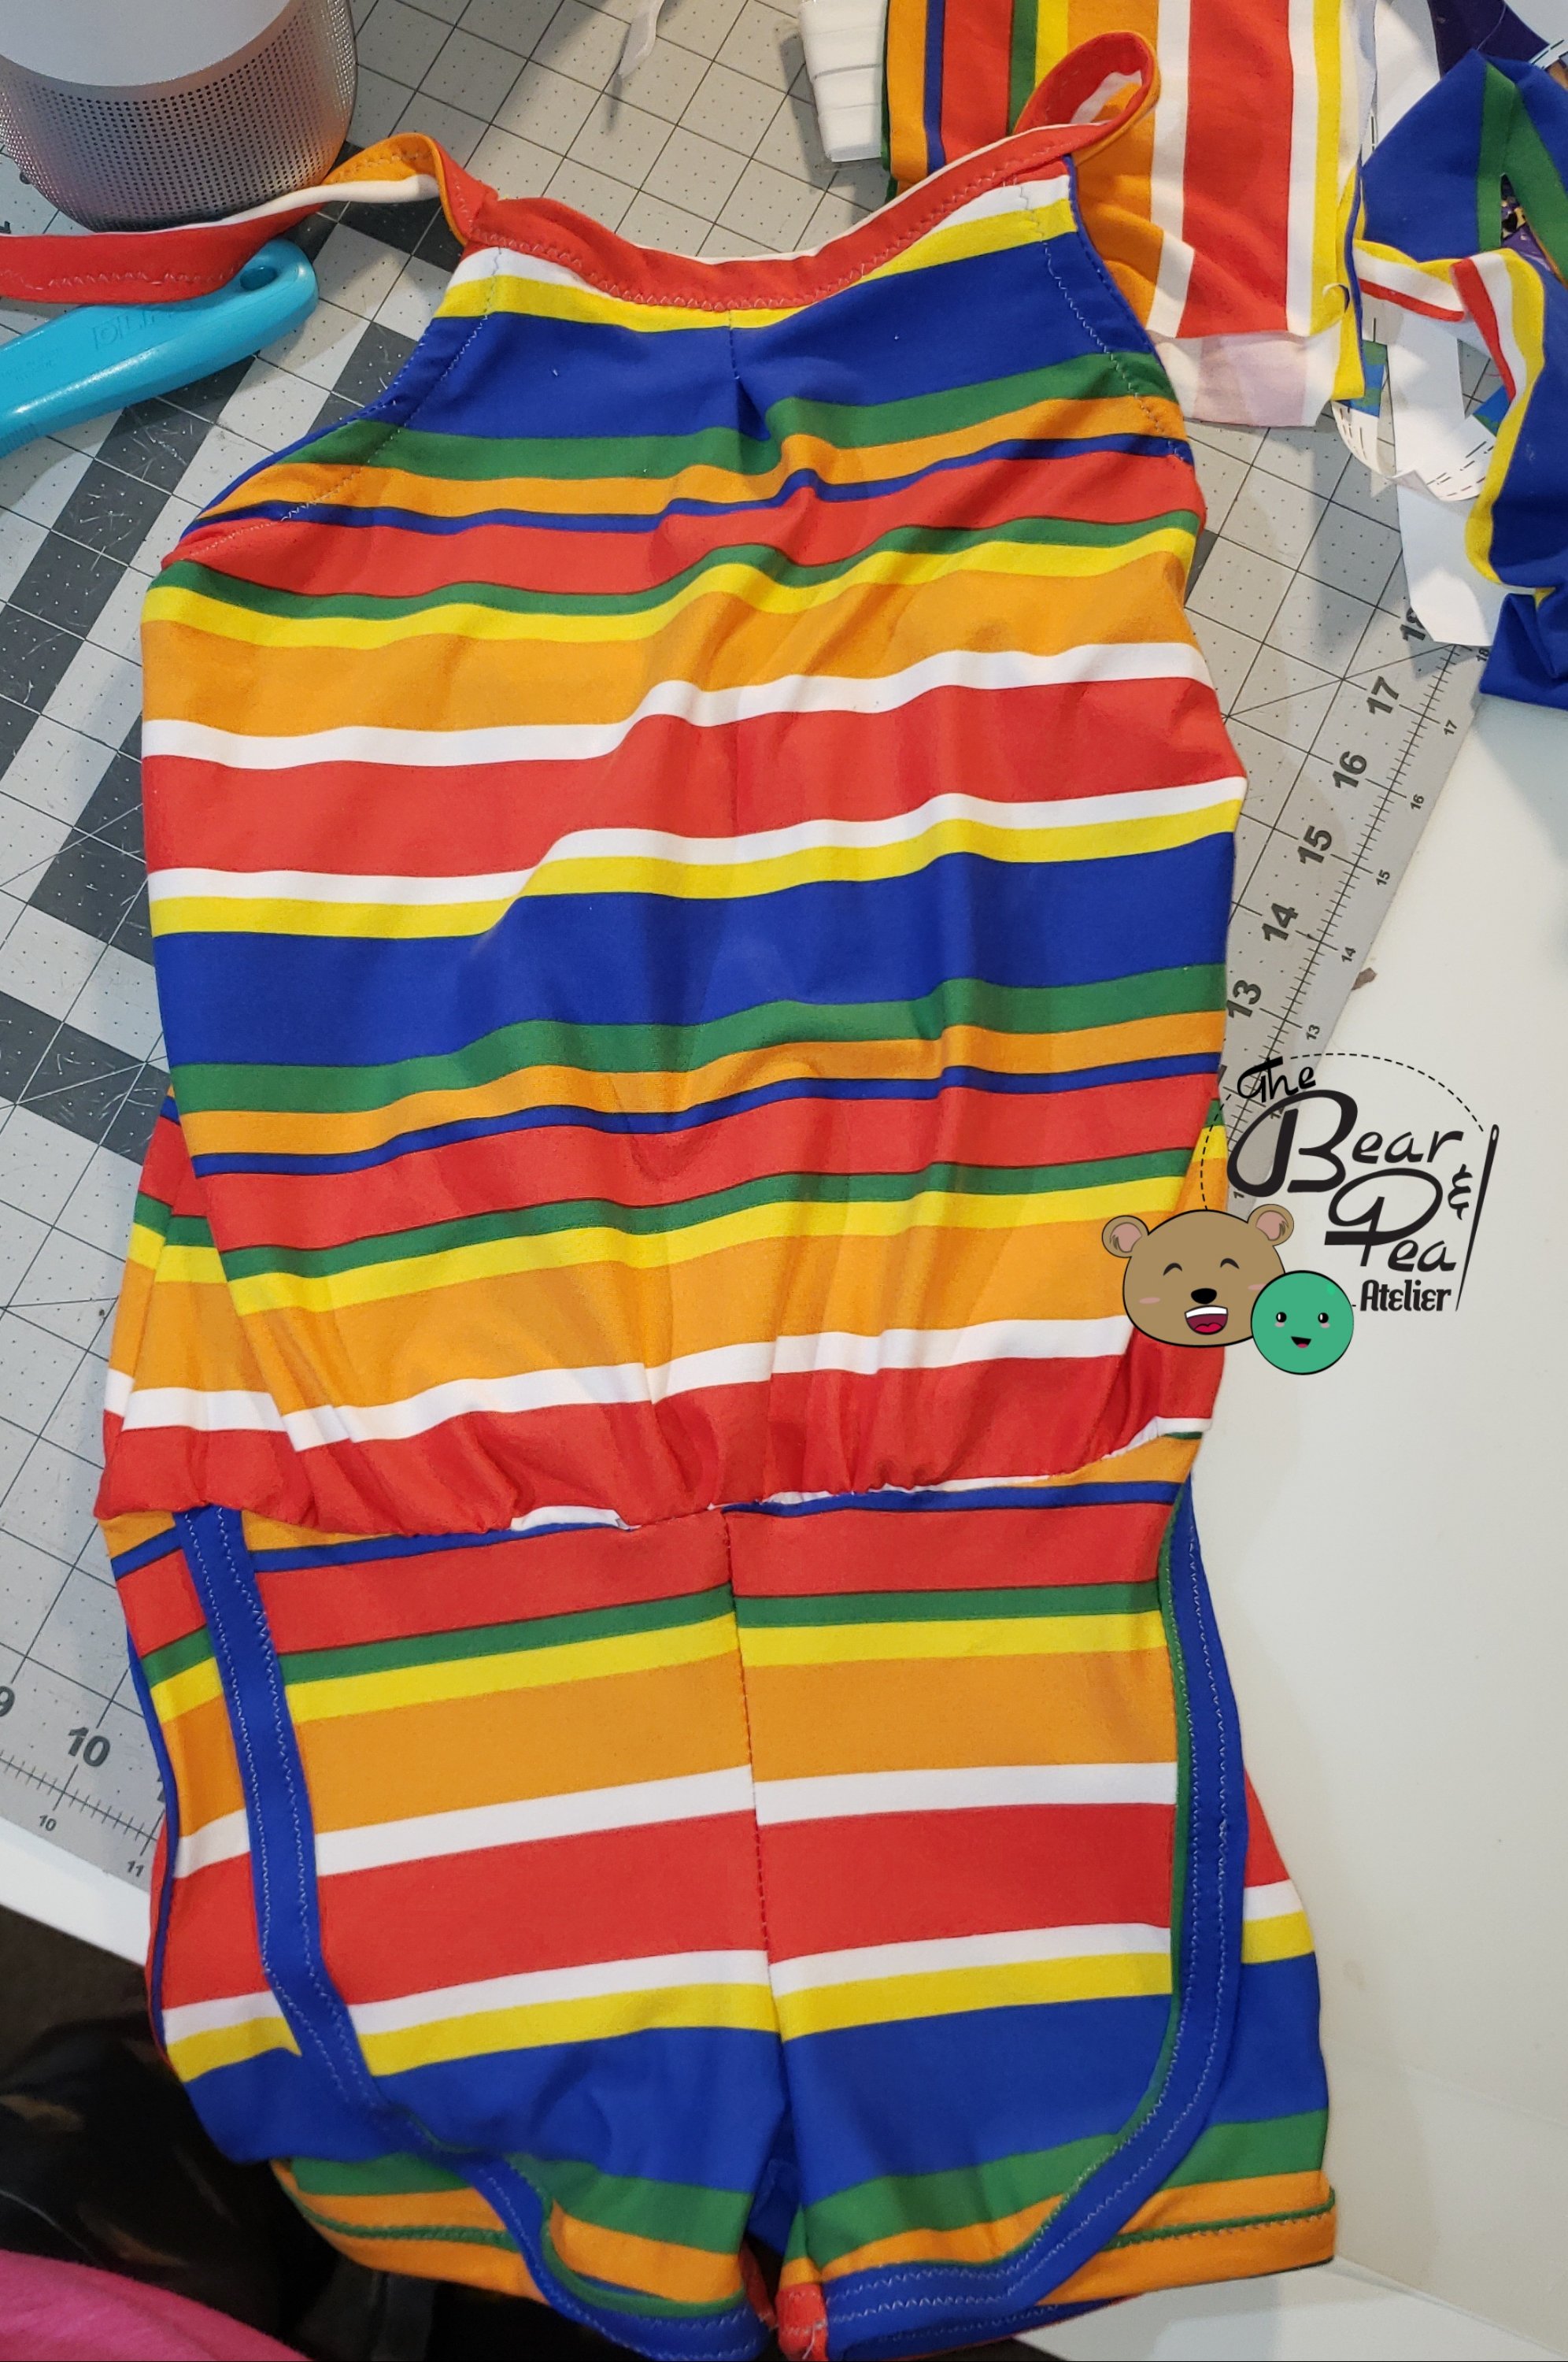
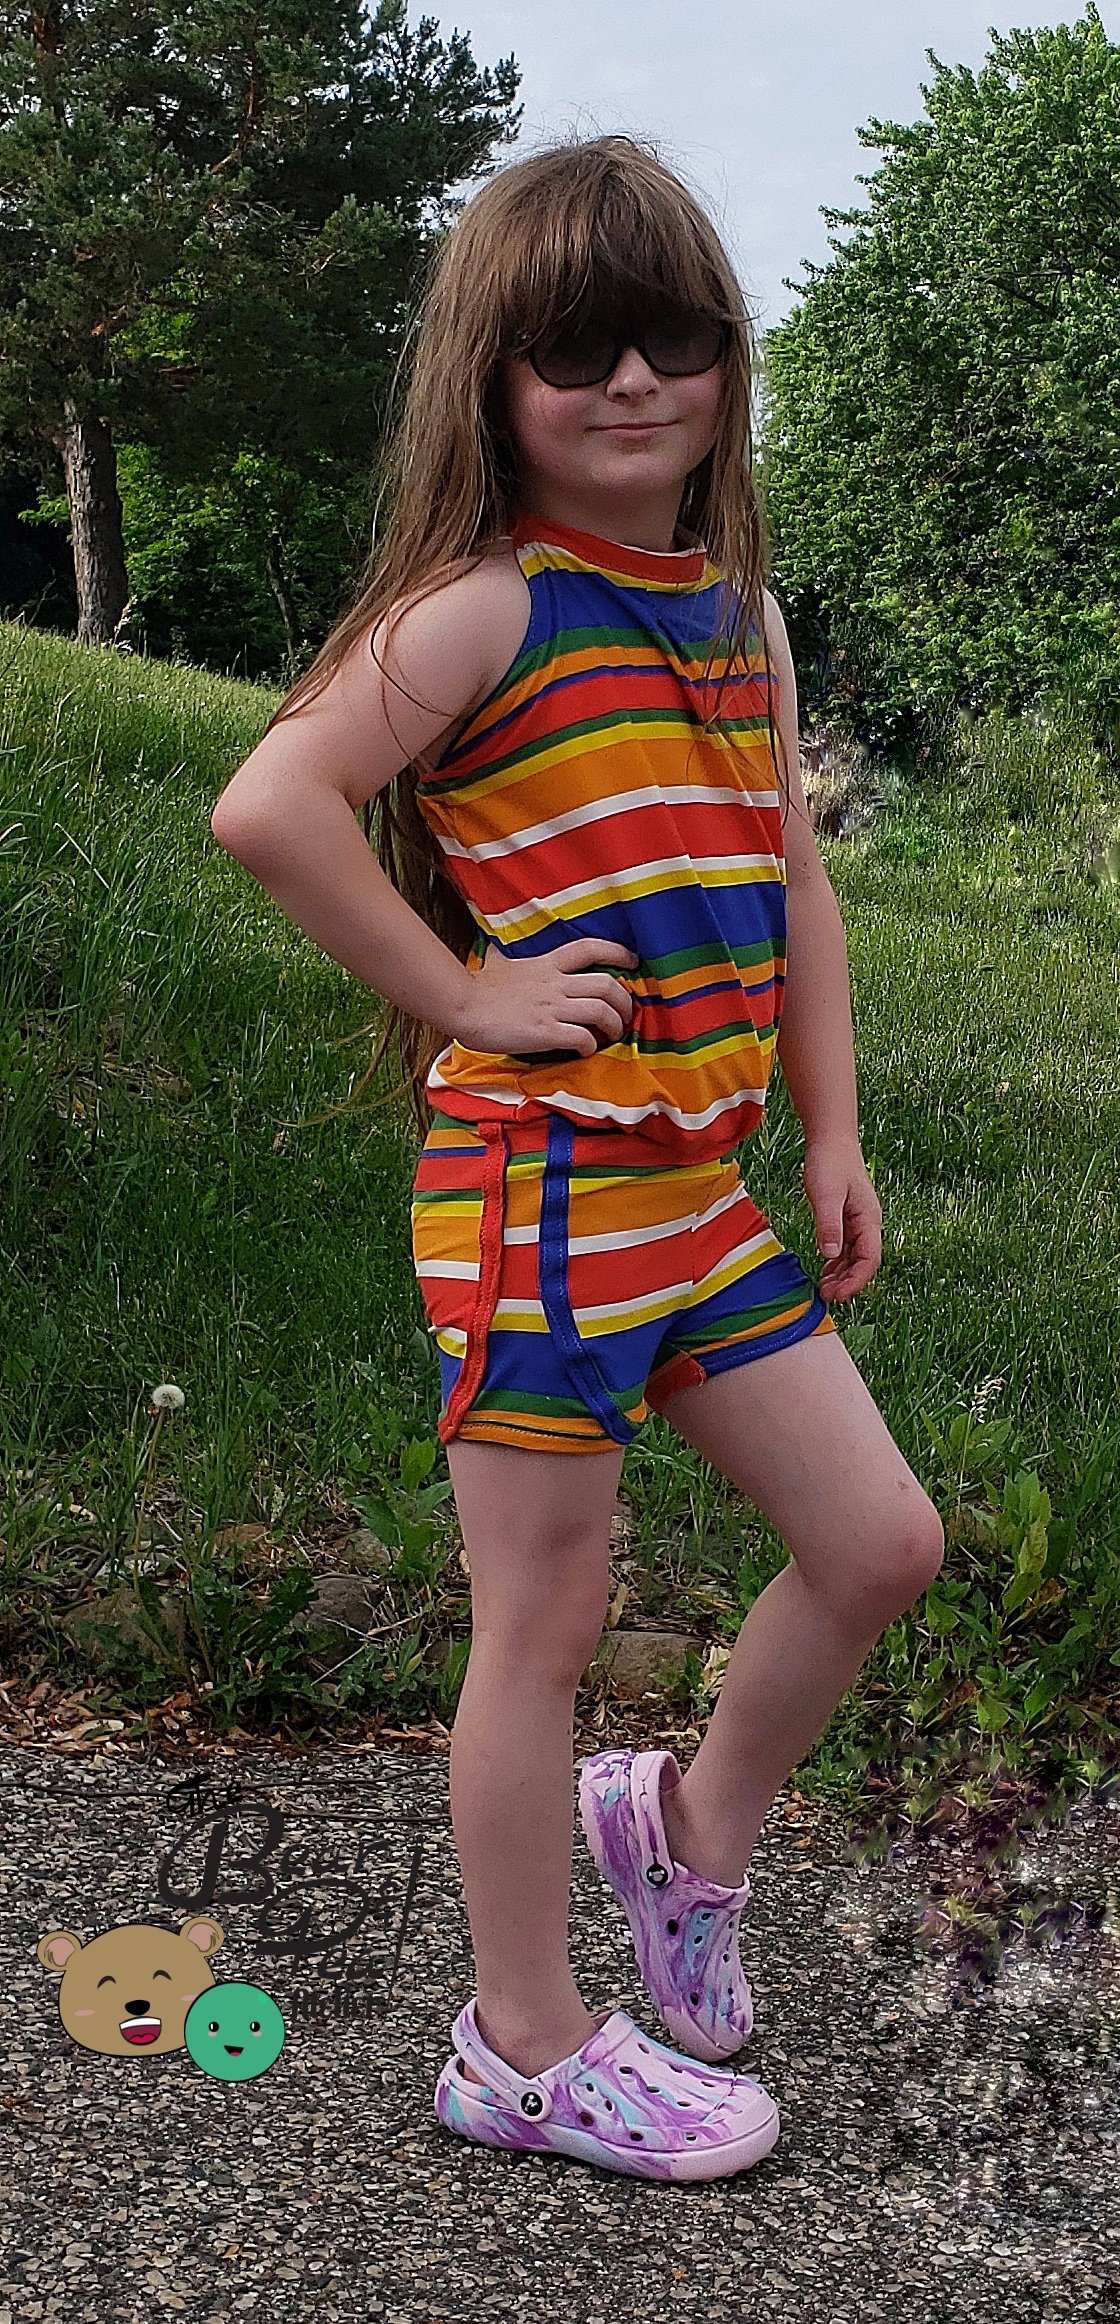
Full image of the 70s style romper
I think it turned out pretty cute. And it turned out just like Sweet Pea imagined it would! I would, in future makes, make a size 3 shorts just to give plenty of room for playing and growing, when using double brushed polyester. But she really loves the fit and really that’s all that is important!
Sweet Pea posting for photos in her 70s style romper
I am so excited to be back on a blog tour, it feels like it has been a really long time since I participated in one! I like blog tours because they keep me on my toes and trying new things. If you follow the blog, you might have seen mention of our recent cross country move from New Hampshire to the Twin Cities region of Minnesota. One of the things we did not expect was to already experience high temperatures in the 90s by the first week in June. So for this post specifically I wanted to work on a few summer staples for my Sweet Pea. She has grown almost 3 inches in the last 2 years, so at this point many of the garments I have made her are starting to get small. Plus we have the added need for creating 2 completely different wardrobes, one specifically designed with summer weight fabrics and one for fall/winter. I New England, I would usually purchase a couple of rtw t-shirts that we would tie dye and kids live in those over sized shirts for the summer with underpants because our high summer heat only lasted about 2 weeks. Here the heat has started before our school year has ended!
For this tour I am using Winter Wear Designs patterns. I will be participating twice this week as I have a very specific vision for a final creation for some really fun striped fabric for Sweet Pea. To make this vision a reality, I wanted to first sew the Petit Pan which is a free pattern. For this top I went with bamboo lycra which has incredible stretch and breathability, just perfect for high temperature days!
Petit Pan Information:
A-line hemline
2 different collars, that can be made with woven materials (or you can choose collarless)
Elastic back
Sizing runs 2-7
A black and white cross hatch Petit Pan with a pair of Racing shorts made from cotton lycra with piggies all over them
For the second pattern, I used the Racing Shorts. Since the final look I am hoping to achieve is a vintage style “roller” romper, I will be trying to create a knit version of these shorts. I could have used the Endless summer shorts which is already designed for knit fabrics however, Sweet Pea really liked the piping detail of the racing shorts.
A back view of the Petit Pan
Racing Shorts for Girls:
Designed for woven fabrics
Elastic waistband
Loose athletic fit
Bias binding
Sixing 18mos-14
For the racing shorts, Sweet Pea actually fits in between a size 6 and 7. Because of this, normally I would make her the 7 to give her plenty of play and growing room and because there is elastic in the waistband. Since I decided to make these in knit, I did go ahead and size down to the size 5. I feel like we could have sized the width smaller (and probably will for the romper since her preference is slightly more slim fit.) But I feel like the shorts came out just adorable and with the right kind of movement that knit fabric gives her.
An additional change was opting for a double elastic waistband because Sweet Pea has some sensory issues with single 1/2 inch elastics. If you would like to hack your waistband to be like ours, here are the steps to take.
For the size 5, cut the waistband at 34 x 4.25 inches
Sew the short sides of the waistband right sides together
Open the waistband and fold in half lengthwise
Cut 2 pieces of 1/2 inch elastic
Sew 3/4 inch down from the fold of the waistband, leaving a hole open for threading the elastic through, creating a casing
Perform the same step again, using your previous stitching line as a guide, sewing 3/4inch down, creating a second casing
Thread your elastic in the top casing, sew your elastic ends together, then close your casing hole
Perform the same step on casing number 2 and now you have your new waistband to attach, continue in the same method as the instructions
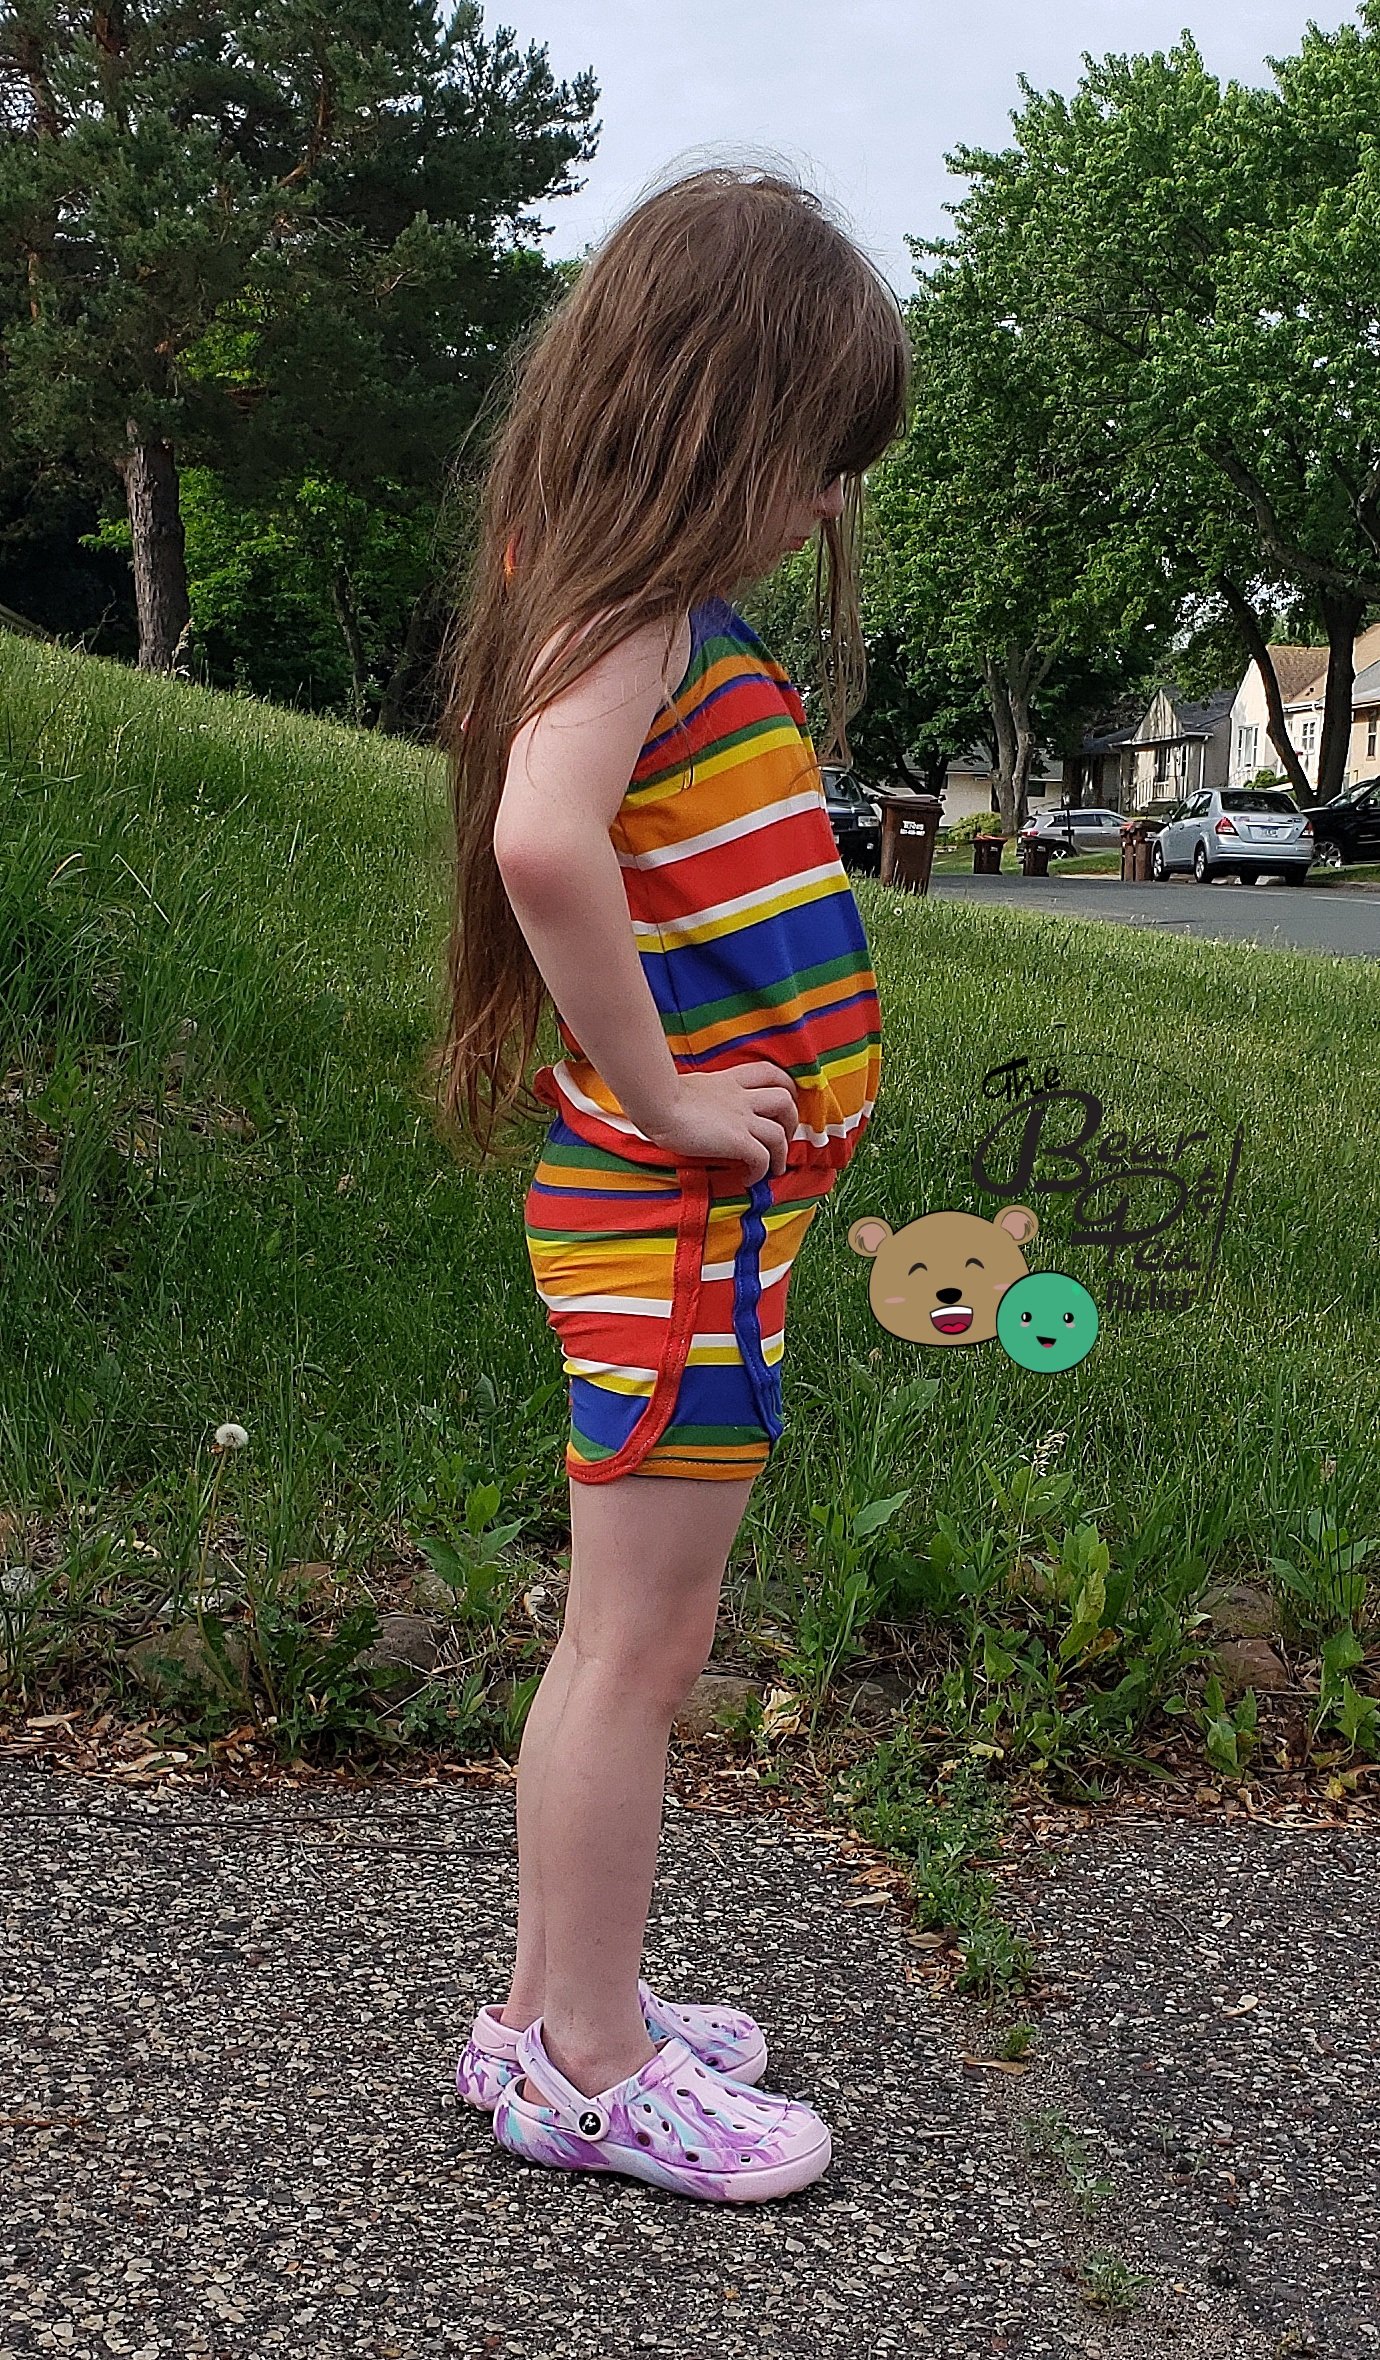
The Petit Pan French tucked into the Racer short while Sweet Pea stands in a variety of positions.
I love the whole look of this outfit and know that Sweet Pea will LOVE being able to run and play not just freely but also while staying cool!
Jumping for joy in her new outfit
Check back with me on Friday to see of my vision matches reality!
Make sure to stick with us all week long for sewing inspiration, pattern hacks, and tutorials about how to get the most out of your summer sewing!!!
We have had a really busy few months, we moved in March then had to get the kids re-established at new schools and doctor’s offices. We had to find housing and get settled (we still need to finish unpacking but the house is finally starting to look like a home again.) And in between all that, Papa Bear and I are trying to find a good working rhythm so I can sew while he works from home- often using my sewing space to work from and leaving me going back and forth or having to schedule my actual sewing days! I must say that I am looking forward to the day when he is back in the office full time so that I can have my space to work in freely.
I have managed to finally get in some pattern testing, which admittedly is still very rare (I have cut back on my sewing to focus more on working with strike offs.) One company that I am always excited to work with is Eunoia Patterns and I was really excited to not just sew the Thalia Dress but also tested the Providence bag (which will be another post.)
Sweet Pea looks off to the left with her hands on her hips in a woven large scale gingham searsucker dress. The dress has white bias trim and ties at each shoulder and the skirt is double-layered with 3 tiers and trimmed in the same white bias trim.
Thalia is the perfect summer sundress pattern and perfect for beginners with no zipper or buttons. The single layer dress has amazing twirl, add a second layer and you get both fluff and twirl!
2 Dress Lengths
bloomer pattern included
Sizes 2T – 20
A4
A0
US Letter
Projector file with layers and both flat & on fold pieces and an optional black background.
PDF layers
No Trim Pages
Sweet Pea is holding the width of the skirt portion of the dress out so you can see how much twirl the dress is going to have.
This is a great dress for kiddos that want something lightweight and twirly. The options are endless for the types of trims and fabric and weights one can use. I really love the spring time look of this large gingham seersucker, but I also look forward to completing one in a slightly heavier fabric to wear with a turtle neck for the winter time.
Sweet Pea spinning, the layers of her dress are caught partially twirling.
The most time consuming aspect of this dress is all the gathers, since the bodice goes together rather quickly. But with the double layer skirt there is a really lovely twirl factor. The vintage length is really adorable especially paired with the bloomers but we opted for the longer length because Papa Bear prefers the longer length for more wearing time for the tiny one.
I also opted for the bias tie on this round and after seeing everyone else creating large bows from their sashes I think I might opt for it the next time I actually add a tie.
Sweet Pea with her hand over her mouth like she is going to blow a kiss
We already have a few more of these dresses planned because they check all of the boxes that make the little one the most happy when it comes to dresses. If you’re looking for a great dress to make then this is for you!
As I mentioned in the Thalia Dress posting there are very few brands I continue to actually test for. I was very excited to see that Melissa with Bella Sunshine Designs was getting back to testing again with this very versatile and scrappy top/dress.
Sweet pea stands in a lime/yellow leopard print long sleeved dress that goes to the knees. It has black stripes on the sleeves and the chest. Her eyes are closed as she is caught beginning to spin in a circle.
This pattern has a ton of features:
Sweet pea looks at the camera in an angled profile view to the left with her right hand on her hip.
This pattern while offering a ton of features is a very quick sew. You might get more hung up on figuring out which version/view you would like to complete then cutting it out, spending more time on that than the actual sewing.
Sweet Pea stands in a tea pot pose with a slight smile on her face.
The most difficult part of the sewing is making sure that the triple stripes line up correctly but go slow and everything will be just fine.
I see lots of these even with the plain sleeves and dress for future makes as Sweet Pea loves a simple A-line silhouette
I have started off this year in a bit of a fog, both feeling relieved that 2020 has closed and 2021 has begun and feeling slightly overwhelmed by events and some known coming changes of the year. Prior to the year closing out, I had decided that I would join the #Sew365Project on Instagram. In this challenge, you commit to getting to your machine each day, presumably to sew a small project such as a quilt block. Because of my mental health and an upcoming cross country move, I had already decided to place less pressure on myself making this challenge a bit more my own. And that as long as I am working on a project, not just at my machine that I am accomplishing the spirit of the challenge. I would post all my makes at the end of the week on IG. I decided to approach it this way because some of my upcoming projects involve applique and just cutting all the pieces then mounting can be time consuming, and while I am not at my machine, I am working in my sewing space and creating.
Additionally, since I dabble in mixed media work, I figured I would include those projects as will since I often use many hours of a day working on them and often find that I can only work on this project for a few days in a row.
I have also committed myself to really work on quilting this year. I have signed up for a quilter’s swap, started a temperature a day block (I assume I will work this project weekly or at least a few days at a time, since I tend to cut then sew.) I did figure out I need to change up my colors because this first 3 weeks has been boring with colors😂
I sewed masks this month for Sweet Pea and now need to work on sewing up mask panels for the Bear. His are a bit more work because of his sensory issues and he needs wire in the nose piece. I’ll get his figured out soon and probably posted during a monthly catch up post like this one later!
As usual I will be in the 52 Week Sewing Challenge and may or may not actually post my makes in the group (I do usually forget but the plan is always to fall along and pray I don’t fall off before May.)is usually always organize your sewing space.
1 Jan 4-10 Organize Your Sewing Space
2 Jan 11-17 Sew a WIP/UFO 3 Jan 18-24 Make a pattern you already own but have never sewn 4 Jan 25-31 Sew Something for Your Feet or Head
Week 1 usually always consists of a sewing room clean up. This year I am in the middle of a move and don’t actually have a dedicated sewing space so I will enter it during the makeup thread.
Week 2 and 3 are a bit combined for me as I have both a WIP started AND have a pattern that I own that I have never made before (Sweet Pea typically does not like jogger/sweatpant style pants.) A WIP or UFO is the favored abreviations for Work In Progress or UnFinished Object. My WIP is a choice that I had cut the pattern but not the fabric as it arrived Monday. I used a couple of patterns from the Sofilantjes brand The Semper Sweater and Domi Sweatpants. These patterns will be featured in an upcoming showcase with Sew PDF Showcase. Speaking of the Sew PDF Showcase….I have a profile listed that’s new and will be working on guest blogging over there every now and then….which is very exciting!
I participated in the last Sew PDF Showcase, featuring the I Glove You pattern from Make It Last Patterns- you can find my blog post on it here! This makes a super cute gift for someone and goes together really rapidly!
I’m working on the another Sew PDF Pattern Showcase plus the Free Bingo that closes at the end of this month which will get me my week 4 entry that I am super excited about. You can find information about the 12 Freebie bingo on the Sew PDF Pattern Showcase Blog.
Sew I think I have caught you up on all my sewing…though I also have a couple of other projects that didn’t get listed because they are gifts and I’m not sure if the person reads the blog.
I recently joined the Sew PDF Pattern Showcase as an affiliate so I now get the opportunity to sew lots of small independent pattern companies. As an affiliate I will be receiving a small commission for any sales generated through the links posted.
I’m posting this late so the sale that ran for Buttons and Bibs Versitilitee no longer is running (sick kids and spouses make you loose track of time.)
I was dying to try this pattern because I wanted to use my wine fabric I had been keeping for a bit and I wanted a new lounge shirt (that will go with quarantine loungers soon hopefully.
Pattern details:
Sizing runs 00-38+
Front Neckline options: Boatneck, Scoop and V-neck
Back Neckline options: Boatneck and V-neck
Sleeve options: Sleeveless, Short, Elbow, 3/4, long with ruching options for 3/4 and long sleeves.
Side Rouching option
Full Bust Adjustment piece included
Thoughts on pattern fit: I enjoy the overall fit of the pattern. I love that a full bust adjustment is included so that means the only alterations I needed to do right away are for my height. I added 1 inch in the shoulder and 2 at the waist since the pattern is drafted for 5ft 5. In the future, I should do a narrow shoulder adjustment as the shoulder seam sits a bit wide on my shoulders (it is not unusual for me to need to do a narrow or round shoulder adjustment.) Though with knits I typically don’t worry about it, I am pretty happy with the width of shoulder coverage. In the end this pattern will be a keeper to make more in the future for myself.
Oooh it’s been a minute- I have been sewing weekly but it is that chaotic time of year where it’s the perfect storm of sport seasons changing, annual appointments for all of Sweet Pea’s specialists and now with the self quarantining and having to teach school. I’m going to be doing something I have never done before and if you read all the way to the end AND COMMENT, I’ll draw a name for a free pattern from Goober Peas Designs Patterns (the pattern company I used for this post today!)
I love when spring comes. It feels so delightful to be outside with a light weight jacket after being bundled up for so many months on end. But with that shift in weather comes digging through my children’s closets to ensure they have what they need for the weather transitions.
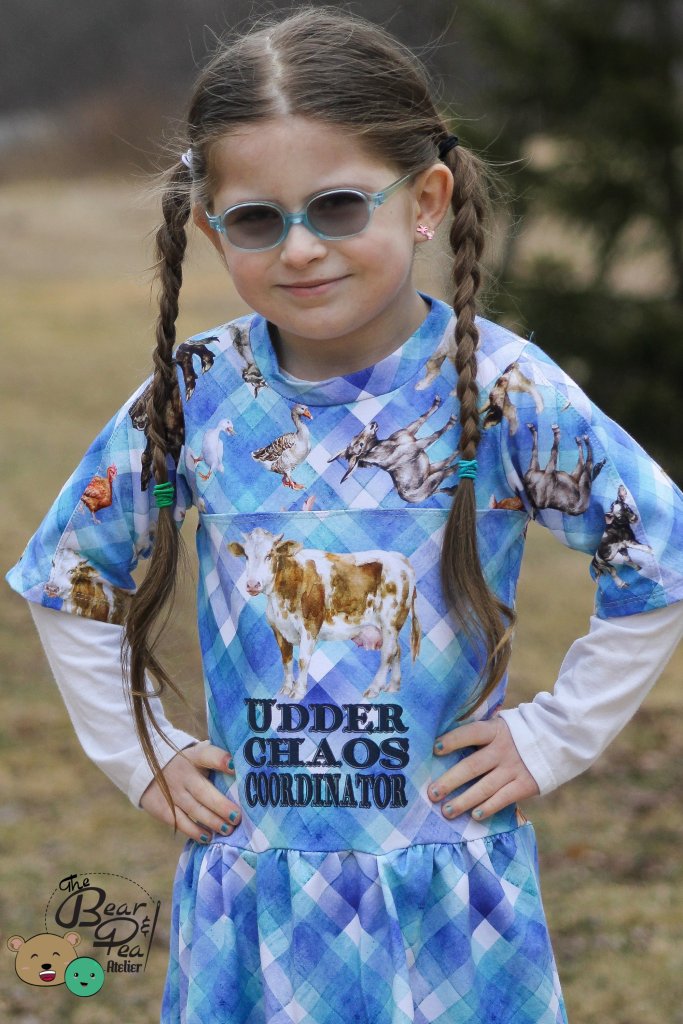
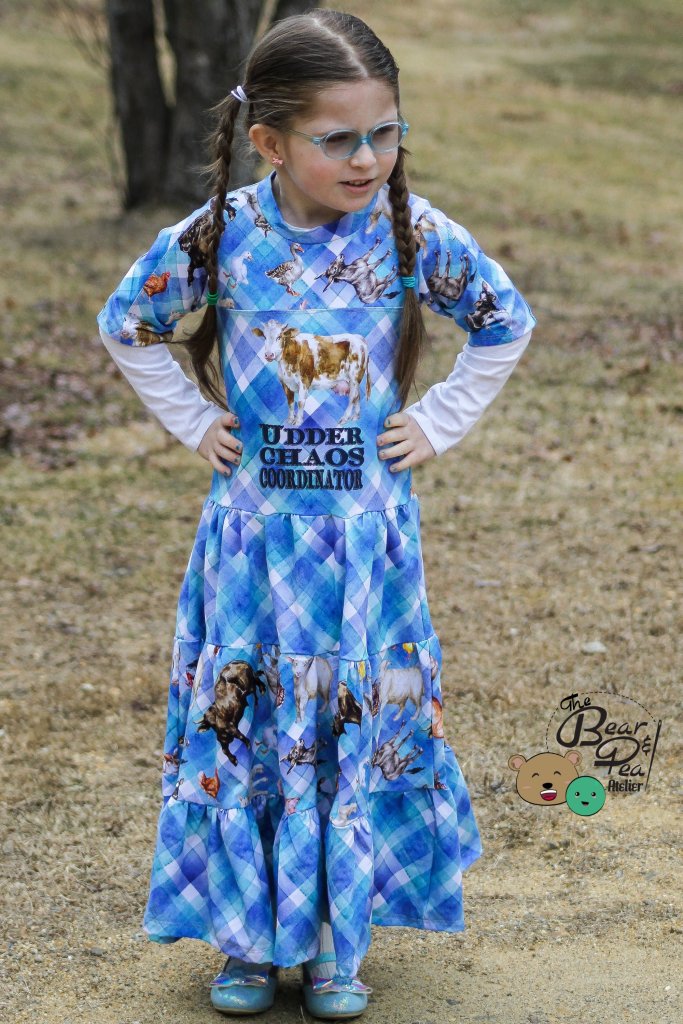
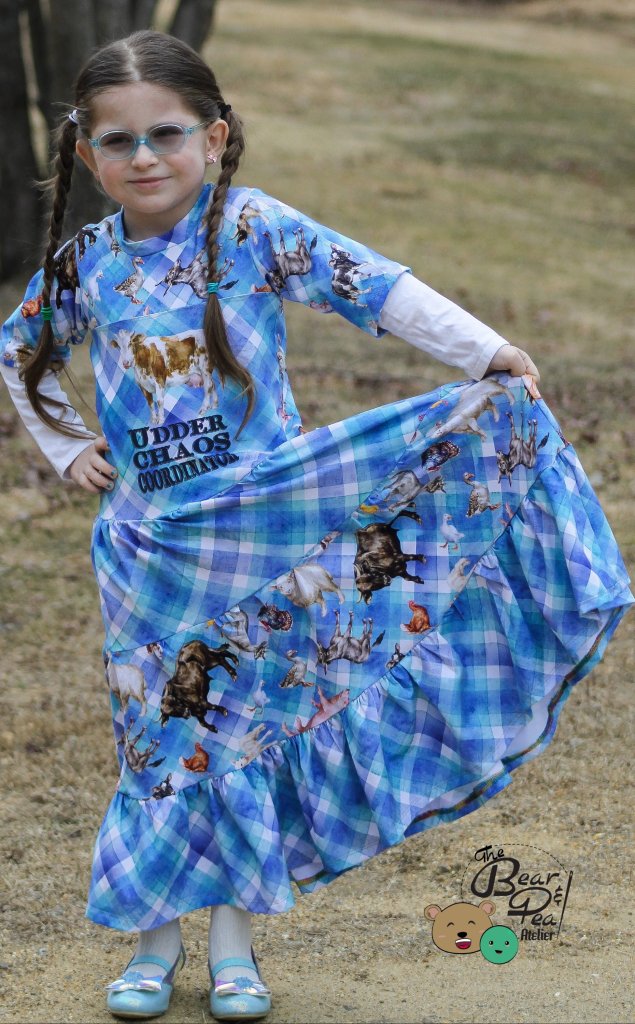
This year Sweet Pea asked for ALLLLLL the dresses. Which isn’t all that unusual for her, she loves dresses. She added she wanted length and twirly to the request.
So this means figuring out new patterns or even better, with all the uncertainty currently going on, digging through the depths of all my patterns and creating fun mash ups.
I decided to fill the request of the wee one I wanted to use bits and pieces of a couple different patterns from Goober Pea Designs Patterns to create a whole new look for her.
I got a super fun farm print from Shear Madness Fabrics and I knew I wanted something with colorblocking.
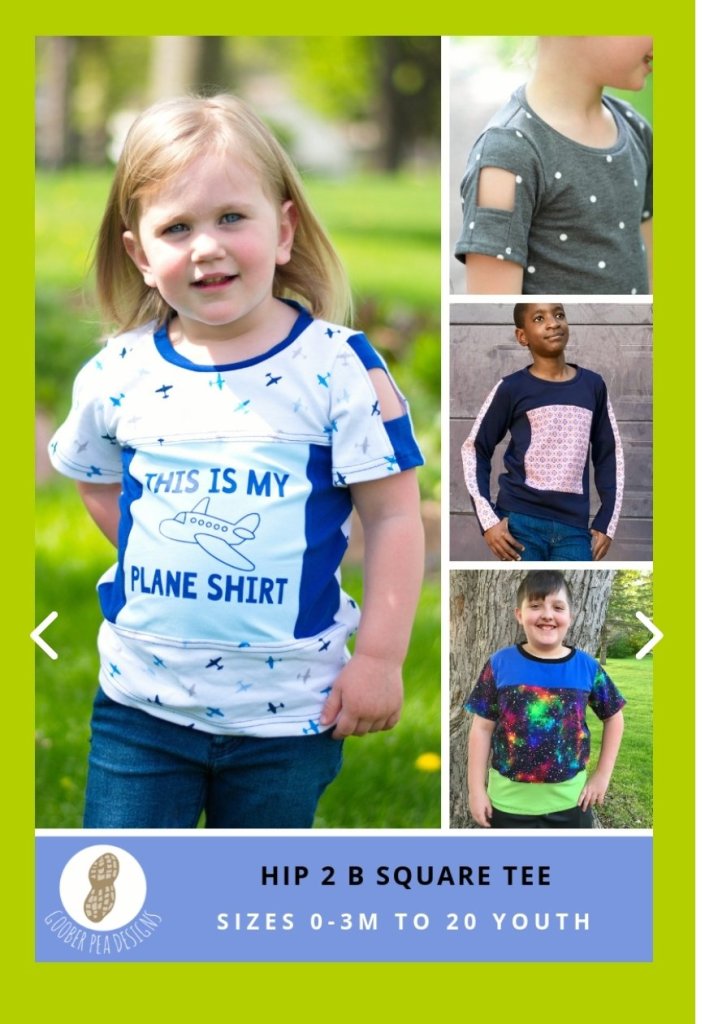
I started with the Hip 2 B Square tee which has a ton of features:
Youth sizing of 0-3mo to size 20
Basic Tee
Short and long sleeve options
Sleeve colorblocking with optional venting
Full or partial color blocking of the bodice
I opted for the short sleeve (Sweet Pea is not a fan of long and it would have been my preference due to the time of year but she was having none of that) with colorblocking of the sleeve and bodice. I left off the bottom colorblocking panel on the bodice and trued the back to match since I was attaching a skirt to the hemline. I also lengthened the sleeve a bit because Sweet Pea prefers elbow length sleeves.
Next to work on the twirl factor and make a dress from the top. I could have gone with the Addison/Sadie add on pack that would have added a circle skirt but I knew with the request of maxi dress length it meant making an adjustment. So I decided to hack/mash it with the Talia Tiered Dress (which is free to newsletter subscribers.)
Talia has a few fun features:
Sizing from 0-3mo- size 14
Sleeveless, short sleeves, long sleeves
1,2 or 3 tiers to make peplum, tunic or dress length
Since the 3 tiers puts the dress at close to a tea length, I knew it would be easy to add a 1.5 inches to each tier to get close to ankle length. It was soo much gathering. I also added clear elastic when attaching the skirt because I was worried about the weight of the skirts with the added length.
She literally wore this dress for a week straight once it came off the machine so I would say this ended up being a successful mash up!
Welcome to the Spring Fling Blog Hop!
Sew Much Charm kicked off the Spring Fling with the Spring Fling Giveaway! A huge congratulations to the winners: Lorna P. of England & Patti V. of Texas! Each prize package had a retail value of $191!
Let’s keep the fun rolling this week with more sewing and more fun. Sew Much Charm is now also hosting the Spring Fling Blog Hop and I’m going to introduce to you our Bloggers for the Blog Hop!
Be sure to check each day by 6AM (Central Standard Time)! Each day there will be a blogger (or more) doing a giveaway! So be sure to check each blog post & just comment on their blog post from this blog hop and you are entered to win!
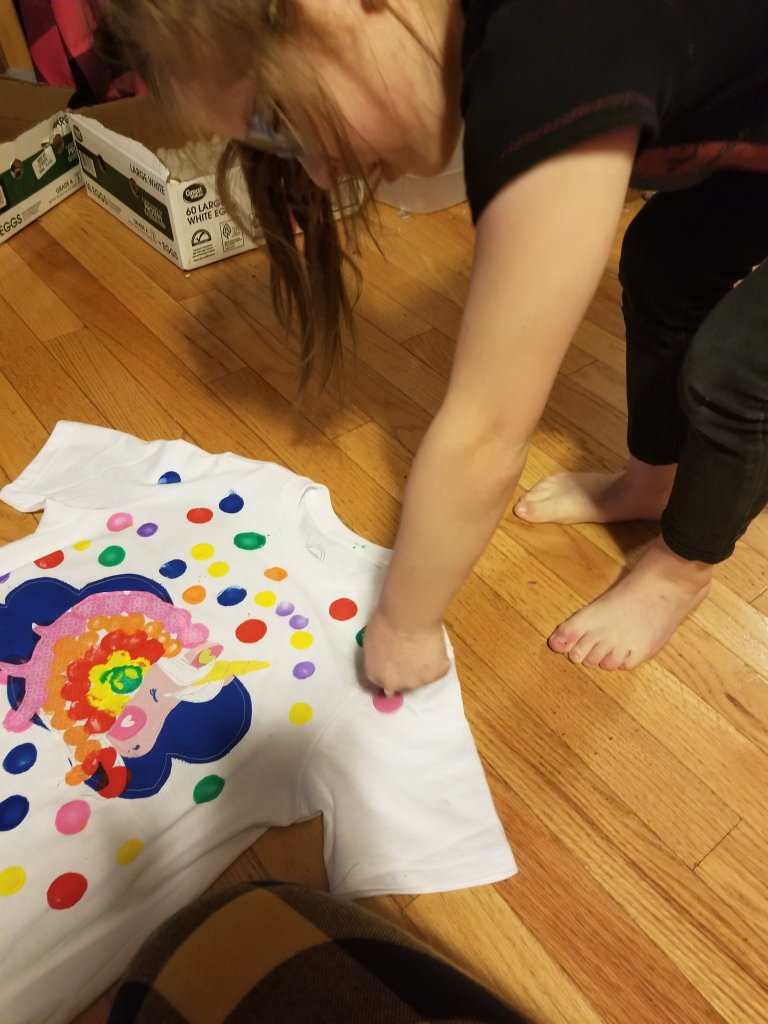
This week I opted for more of a refashion over the upcycle. My definition of choosing refashion comes from using a RTW t-shirt we have had for a bit and turned it into a 100 day t-shirt for school.
I asked Sweet Pea what she wanted for a design element and after a bit of time she opted for an appliqued unicorn.
We went with a Unicorn Applique from the German Makerist and I got to work making a unicorn in the colors that Sweet Pea wanted.
It was lots of stitching and a bit awkward since the shirt was a rtw shirt (note to self, next time I work on an applique for a shirt, it should be done before sewing the top together.)
It turned out really cute now it was up to Sweet Pea to add 100 dots with various colors to decorate it.
Our final product came out great!
100 days of school all summed up in a fun project.