If you follow the blog, you know that I sewed the Petite Pan and Racing Shorts in knit fabric earlier this week (you can findthat post here.) After talking to Sweet Pea she decided that she wanted the shorts tighter and the top attached to shirts for a fun swimsuit cover up or outfit for riding her bike.
Since this is an add on post hacking previous patterns (linked above) I’m just going to cover the change in construction.
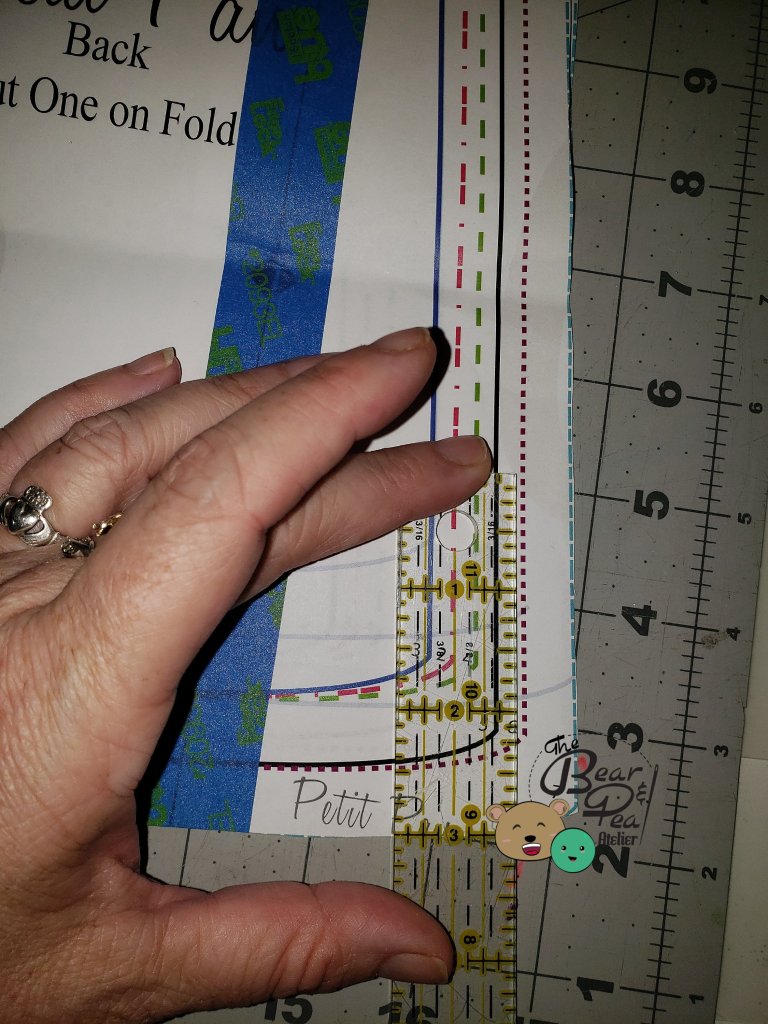
I started with taking 3 inches off the length of the Petite Pan, though once made I realized I could have probably left the original length to provide lots of room for Sweet Pea’s longer torso.
Part of a pattern piece being measured off 3 inches to shorten it.
After shortening it appropriately, I constructed the Petite Pan the same as the instructions then added a gathering stitch to the bottom of the hemline. Next I constructed the shorts the same as the instructions. I did an 18 month sizing as Sweet Pea specifically indicated she wanted the shorts much more fitted.
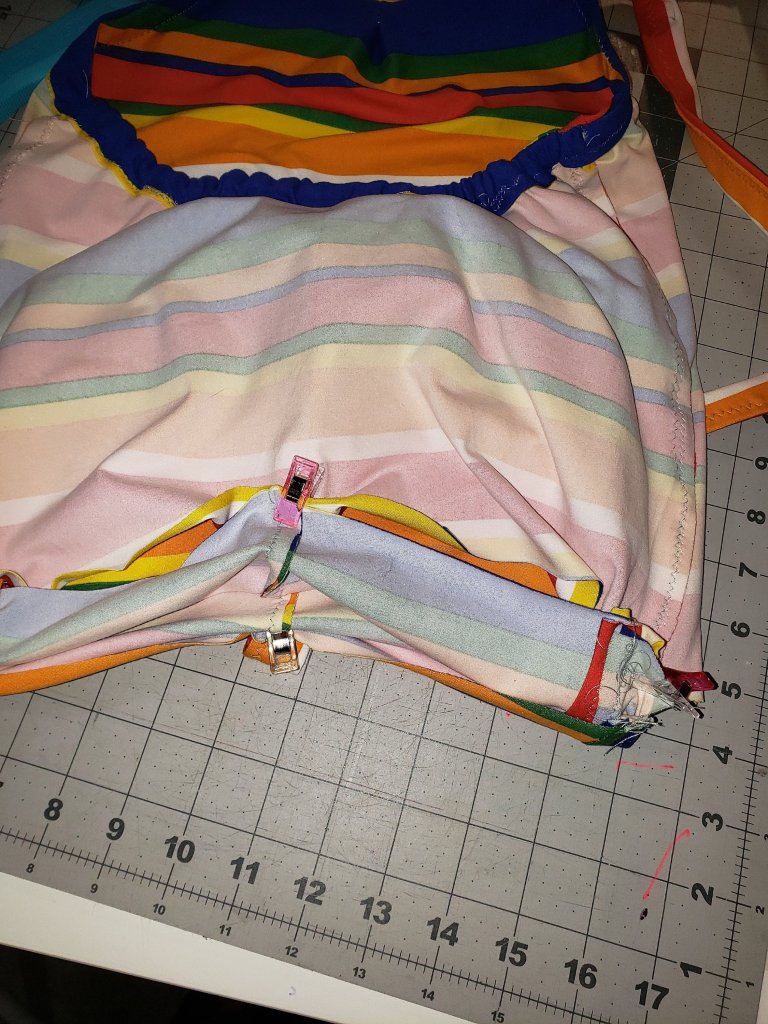
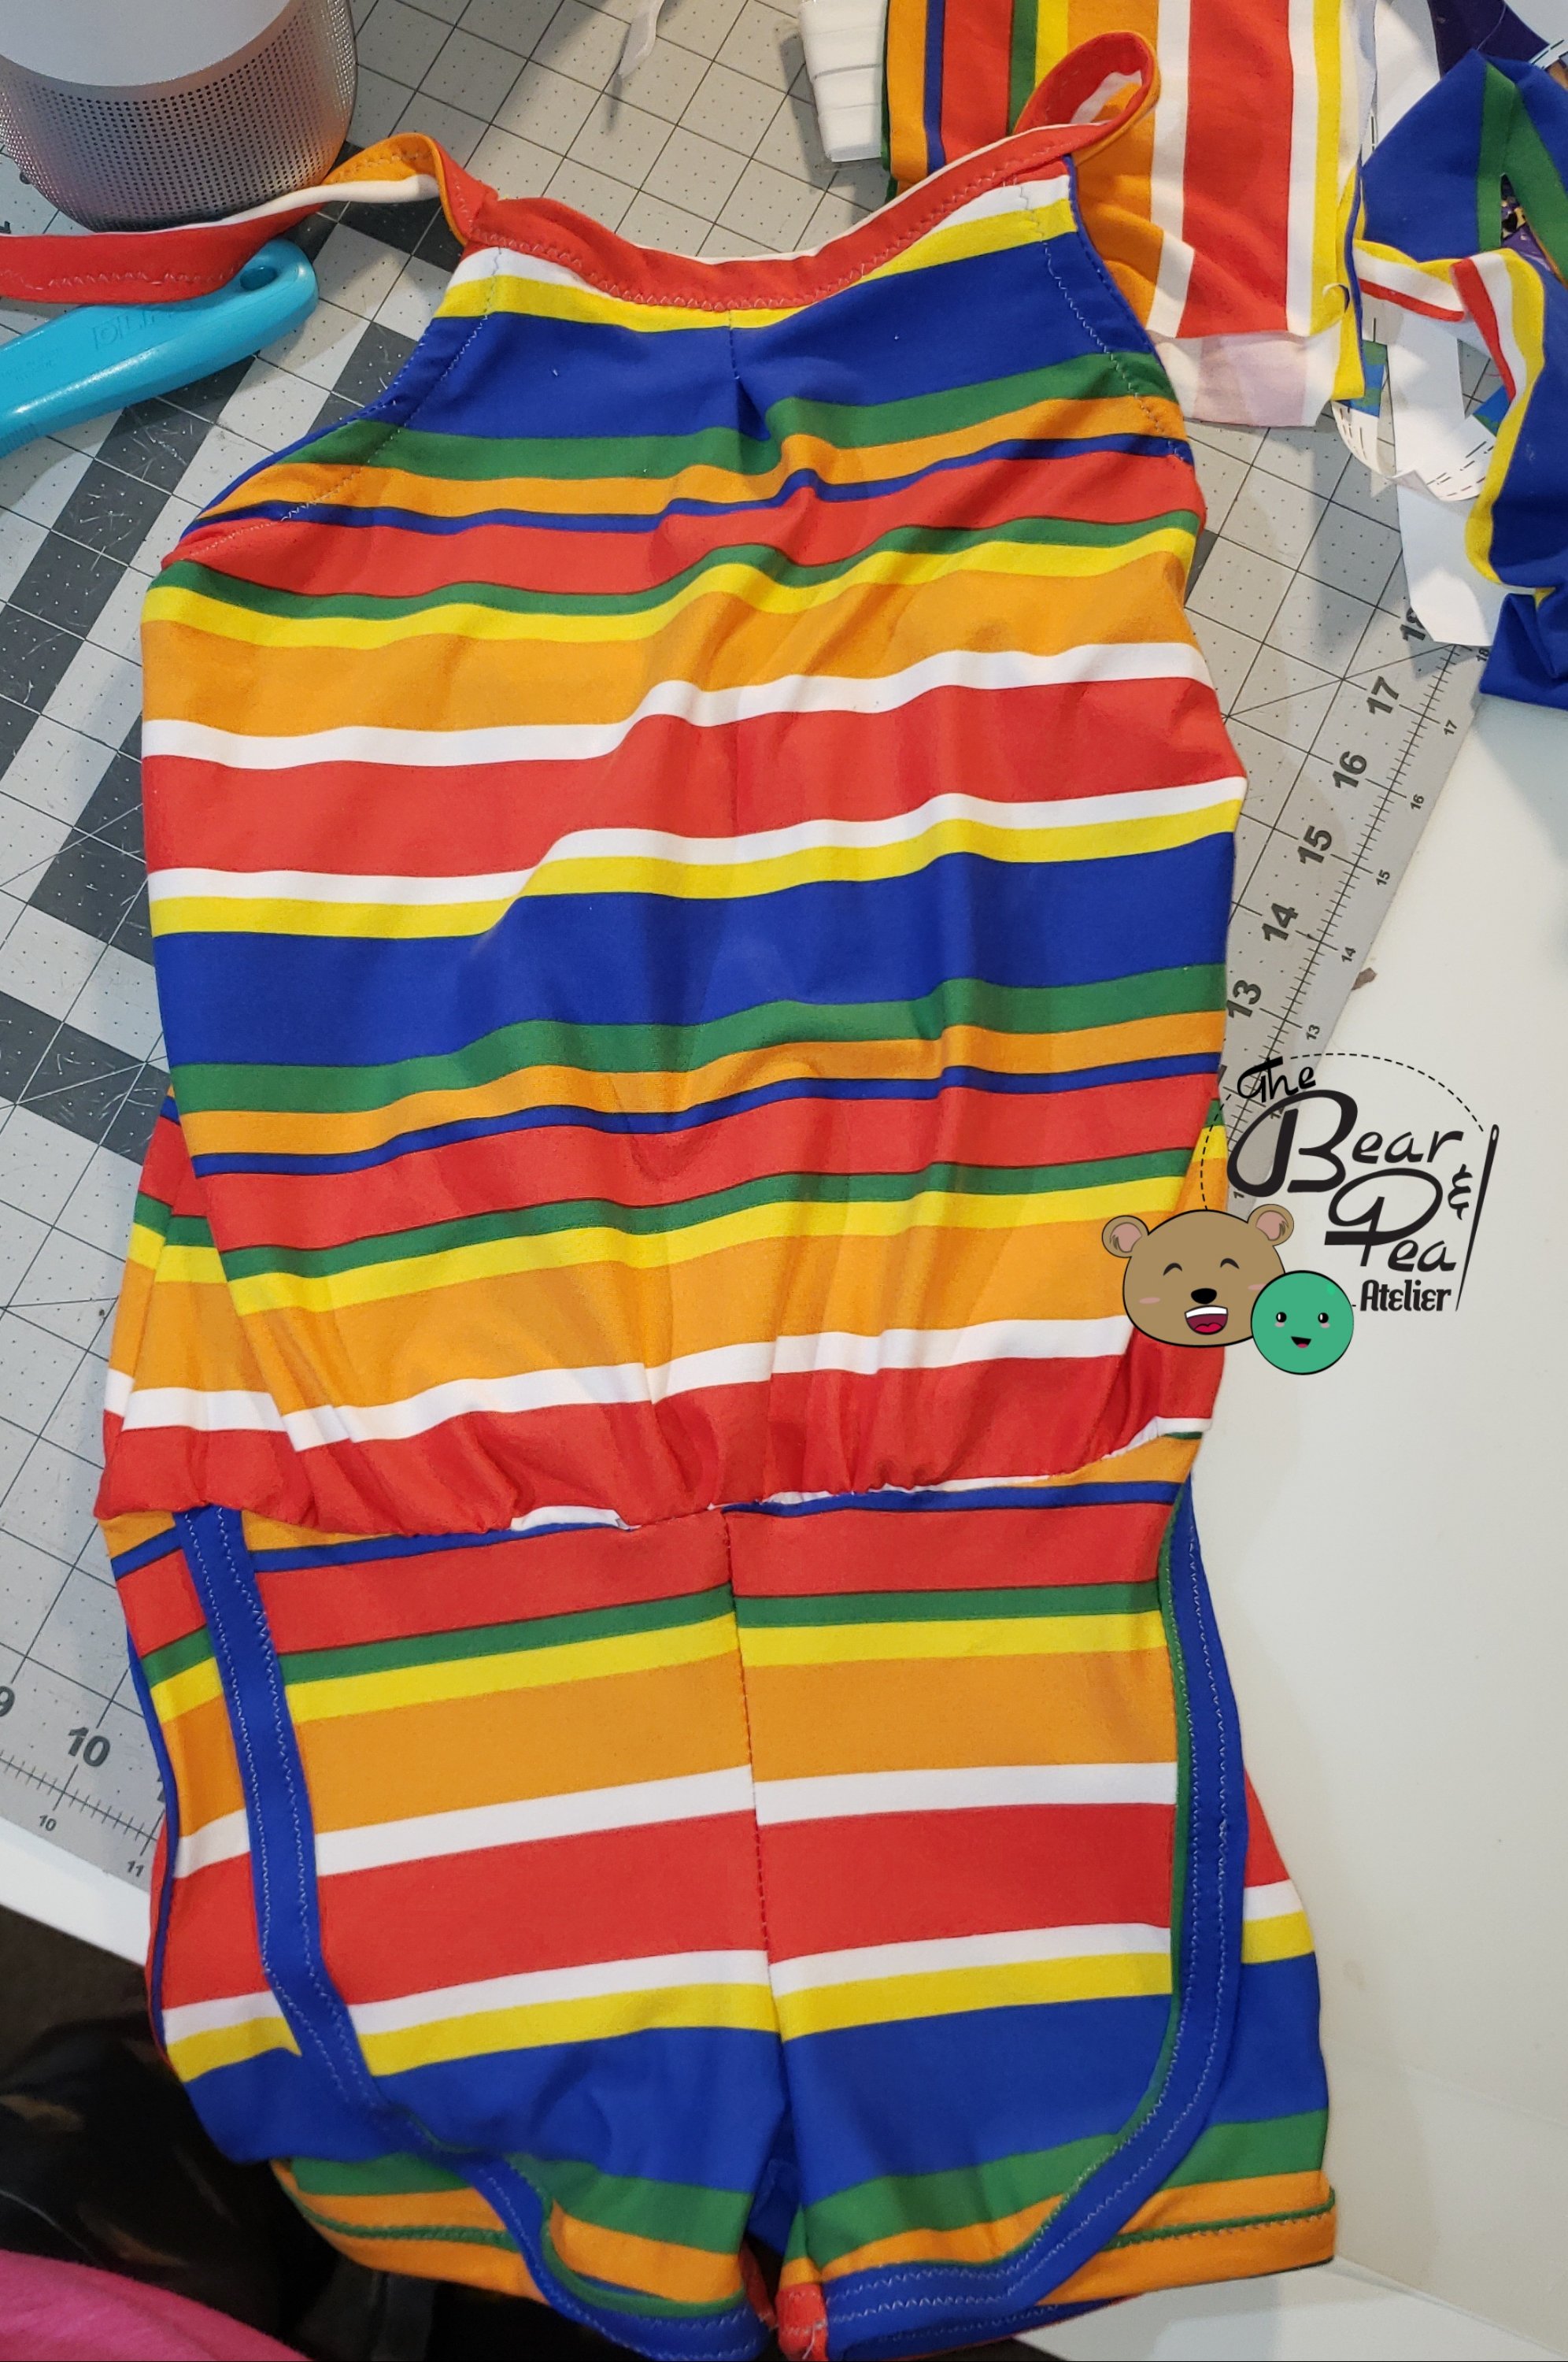
Image of the top clipped to the shorts.
Once I sewed the top to the shorts, I added elastic to the hem allowance to create the waistline.
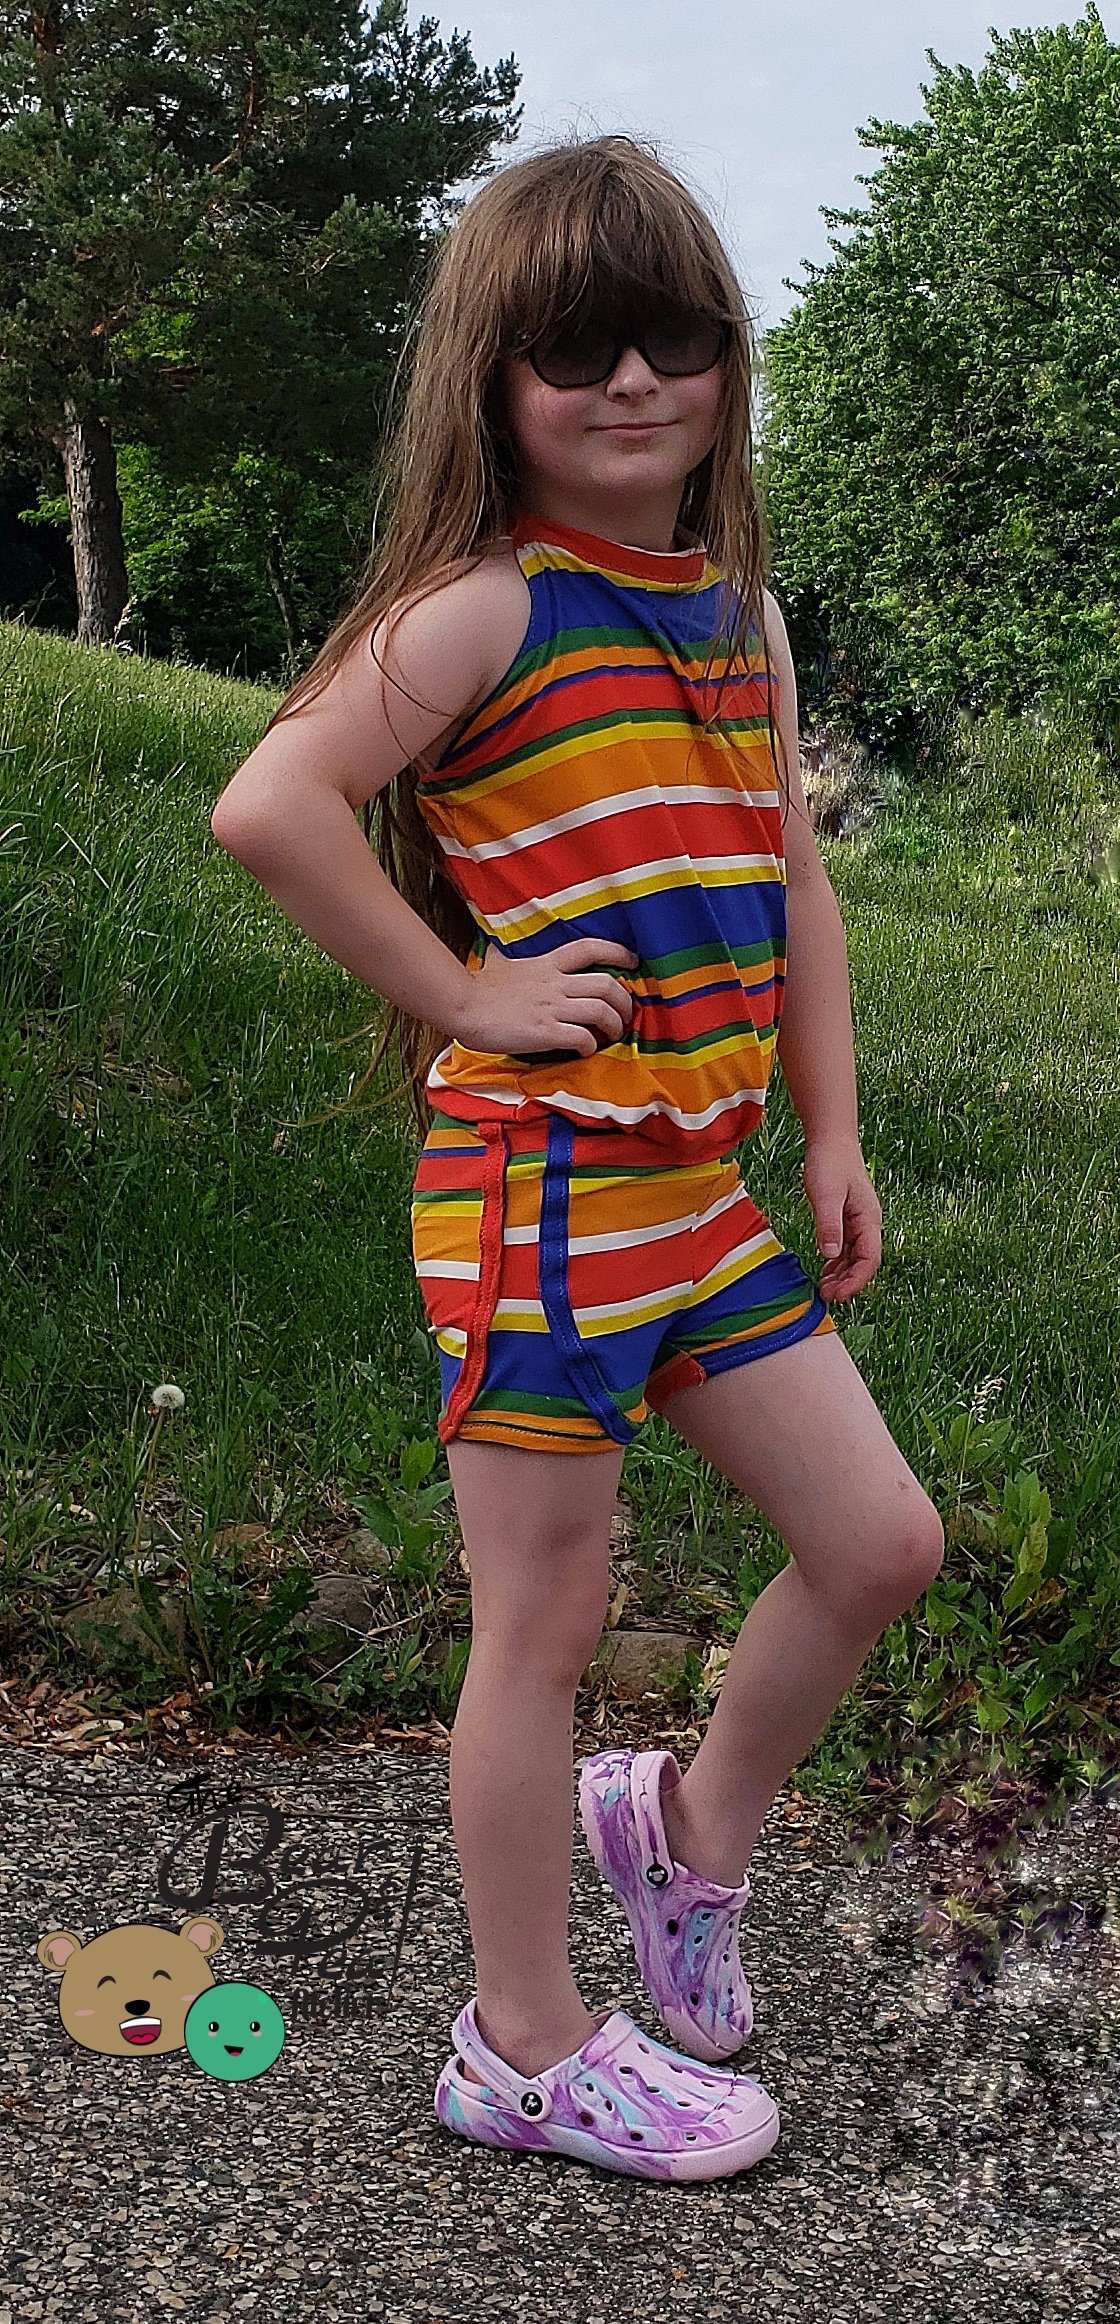
Full image of the 70s style romper
I think it turned out pretty cute. And it turned out just like Sweet Pea imagined it would! I would, in future makes, make a size 3 shorts just to give plenty of room for playing and growing, when using double brushed polyester. But she really loves the fit and really that’s all that is important!
Sweet Pea posting for photos in her 70s style romper
I am so excited to be back on a blog tour, it feels like it has been a really long time since I participated in one! I like blog tours because they keep me on my toes and trying new things. If you follow the blog, you might have seen mention of our recent cross country move from New Hampshire to the Twin Cities region of Minnesota. One of the things we did not expect was to already experience high temperatures in the 90s by the first week in June. So for this post specifically I wanted to work on a few summer staples for my Sweet Pea. She has grown almost 3 inches in the last 2 years, so at this point many of the garments I have made her are starting to get small. Plus we have the added need for creating 2 completely different wardrobes, one specifically designed with summer weight fabrics and one for fall/winter. I New England, I would usually purchase a couple of rtw t-shirts that we would tie dye and kids live in those over sized shirts for the summer with underpants because our high summer heat only lasted about 2 weeks. Here the heat has started before our school year has ended!
For this tour I am using Winter Wear Designs patterns. I will be participating twice this week as I have a very specific vision for a final creation for some really fun striped fabric for Sweet Pea. To make this vision a reality, I wanted to first sew the Petit Pan which is a free pattern. For this top I went with bamboo lycra which has incredible stretch and breathability, just perfect for high temperature days!
Petit Pan Information:
A-line hemline
2 different collars, that can be made with woven materials (or you can choose collarless)
Elastic back
Sizing runs 2-7
A black and white cross hatch Petit Pan with a pair of Racing shorts made from cotton lycra with piggies all over them
For the second pattern, I used the Racing Shorts. Since the final look I am hoping to achieve is a vintage style “roller” romper, I will be trying to create a knit version of these shorts. I could have used the Endless summer shorts which is already designed for knit fabrics however, Sweet Pea really liked the piping detail of the racing shorts.
A back view of the Petit Pan
Racing Shorts for Girls:
Designed for woven fabrics
Elastic waistband
Loose athletic fit
Bias binding
Sixing 18mos-14
For the racing shorts, Sweet Pea actually fits in between a size 6 and 7. Because of this, normally I would make her the 7 to give her plenty of play and growing room and because there is elastic in the waistband. Since I decided to make these in knit, I did go ahead and size down to the size 5. I feel like we could have sized the width smaller (and probably will for the romper since her preference is slightly more slim fit.) But I feel like the shorts came out just adorable and with the right kind of movement that knit fabric gives her.
An additional change was opting for a double elastic waistband because Sweet Pea has some sensory issues with single 1/2 inch elastics. If you would like to hack your waistband to be like ours, here are the steps to take.
For the size 5, cut the waistband at 34 x 4.25 inches
Sew the short sides of the waistband right sides together
Open the waistband and fold in half lengthwise
Cut 2 pieces of 1/2 inch elastic
Sew 3/4 inch down from the fold of the waistband, leaving a hole open for threading the elastic through, creating a casing
Perform the same step again, using your previous stitching line as a guide, sewing 3/4inch down, creating a second casing
Thread your elastic in the top casing, sew your elastic ends together, then close your casing hole
Perform the same step on casing number 2 and now you have your new waistband to attach, continue in the same method as the instructions
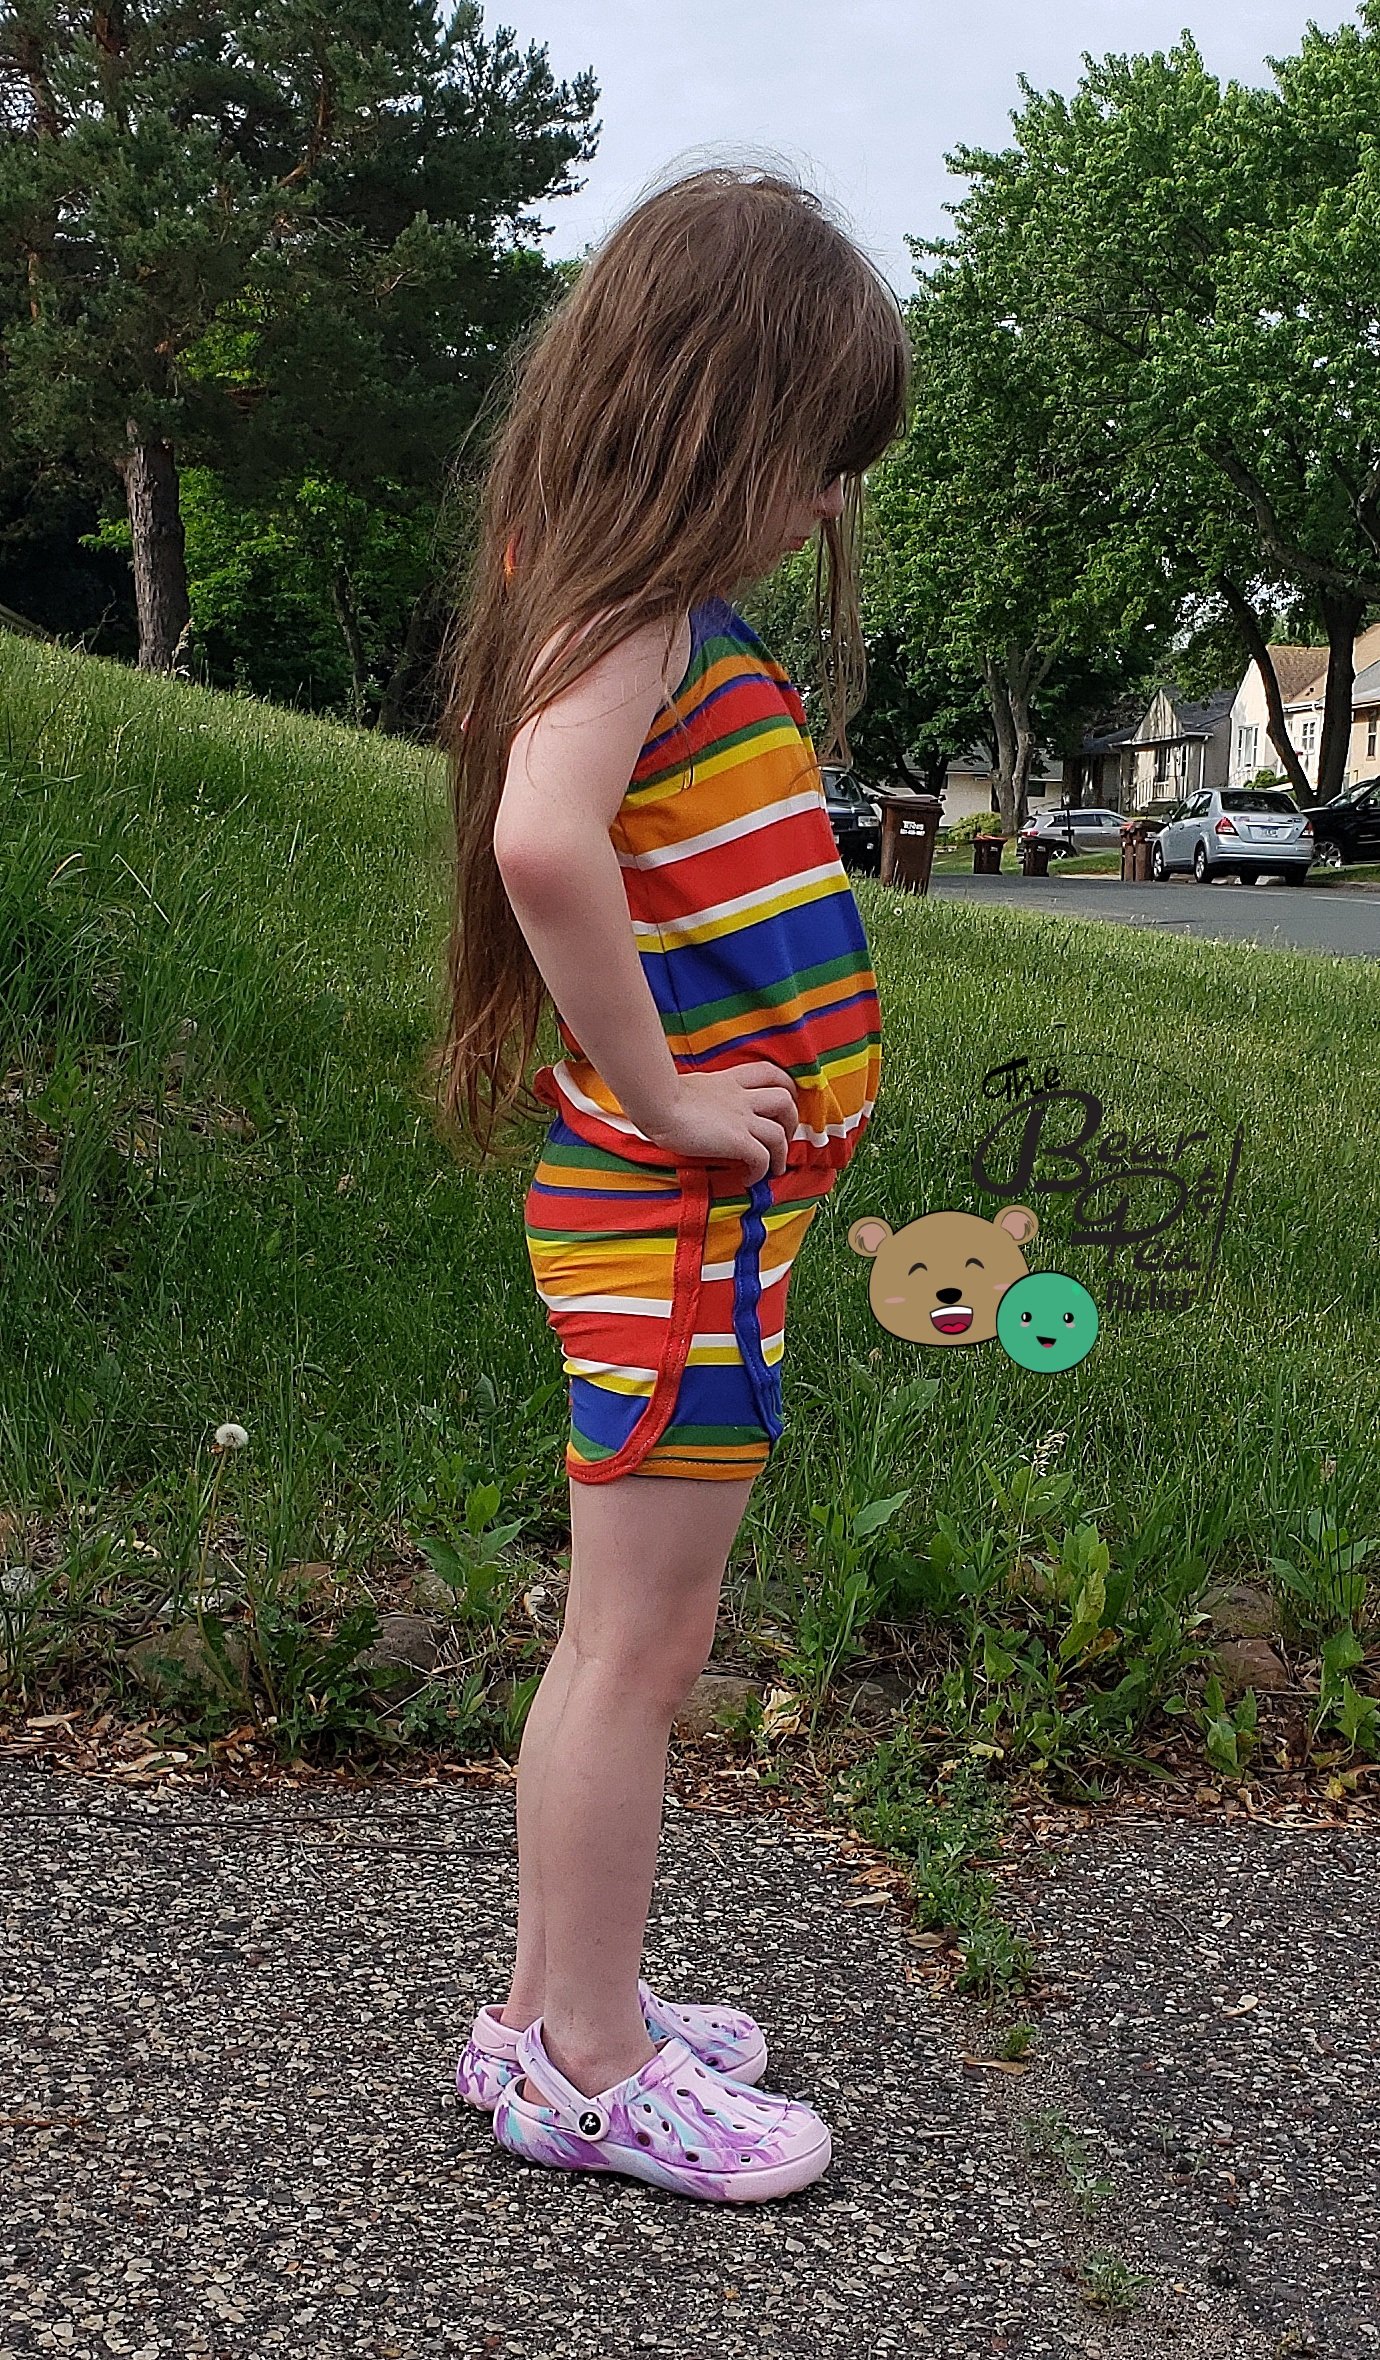
The Petit Pan French tucked into the Racer short while Sweet Pea stands in a variety of positions.
I love the whole look of this outfit and know that Sweet Pea will LOVE being able to run and play not just freely but also while staying cool!
Jumping for joy in her new outfit
Check back with me on Friday to see of my vision matches reality!
Make sure to stick with us all week long for sewing inspiration, pattern hacks, and tutorials about how to get the most out of your summer sewing!!!
Otherwise known as time of year that PDF pattern companies end up offering freebies! This year I will do my usual sewing from Winter Wear Designs because there are always soo many great freebies… further down the blog you’ll find links to past freebies I have sewn from WWD.
I get incredibly excited this time of year when practical gifts come out as freebie patterns. This year, I was soo excited to see that bowl covers were on the list for WWD! We have been trying to make the transition to using more sustainable items for our home, we are really working this year to cut out plastic bags. Try as I might, breaking my tiniest one from plastic bags has been HARD. She has become compliant and happy using containers and snack bowls but we struggled with the 1 gallon size bag the most. Her favorite daily snack is popcorn and she happily pops the corn and leaves it in a bowl for me to put in the ziploc because she won’t eat it if it “goes stale” but I HATE the plastic. So I figure this might be the prefect way to wean her off of going through a box of 1 gallon bags a month!
The standard bowl we use is roughly 9 inches in diameter and was happy to see that there were multiple sizes. I really also loved the fact that there are multiple options for construction. I went with the serged version so that it would mean I could avoid a casing. I chose some vintage fabric that I have had for quite some time because it has some of her favorite colors (and I have found over time using fabrics she likes has been key to the transition of helping her make a change!)
I love the fit on both our smaller bowl AND larger one! AND amzingly enough because I picked the serged option, I spent more time measuring my bowls to know which size to pick and cutting out the fabric than actual sewing. This would be an awesome gift for anyone that works on sustainability as you could very easily batch cut and sew and have I would say be able to sew 10-15 in 30 minutes…..Guess what my kids teachers are getting, also any last minute gifting needs as I can whip up a few and just have them on hand! Also you can pair them with the Totally Tote and Produce Bags amd have a perfect gift to encourage sustainability!
She looks really happy, so lets see how long she uses it!
Check out my last year post where I sewed a bunch of my favorite freebies: Sew Festive Holiday!
Oooh it’s been a minute- I have been sewing weekly but it is that chaotic time of year where it’s the perfect storm of sport seasons changing, annual appointments for all of Sweet Pea’s specialists and now with the self quarantining and having to teach school. I’m going to be doing something I have never done before and if you read all the way to the end AND COMMENT, I’ll draw a name for a free pattern from Goober Peas Designs Patterns (the pattern company I used for this post today!)
I love when spring comes. It feels so delightful to be outside with a light weight jacket after being bundled up for so many months on end. But with that shift in weather comes digging through my children’s closets to ensure they have what they need for the weather transitions.
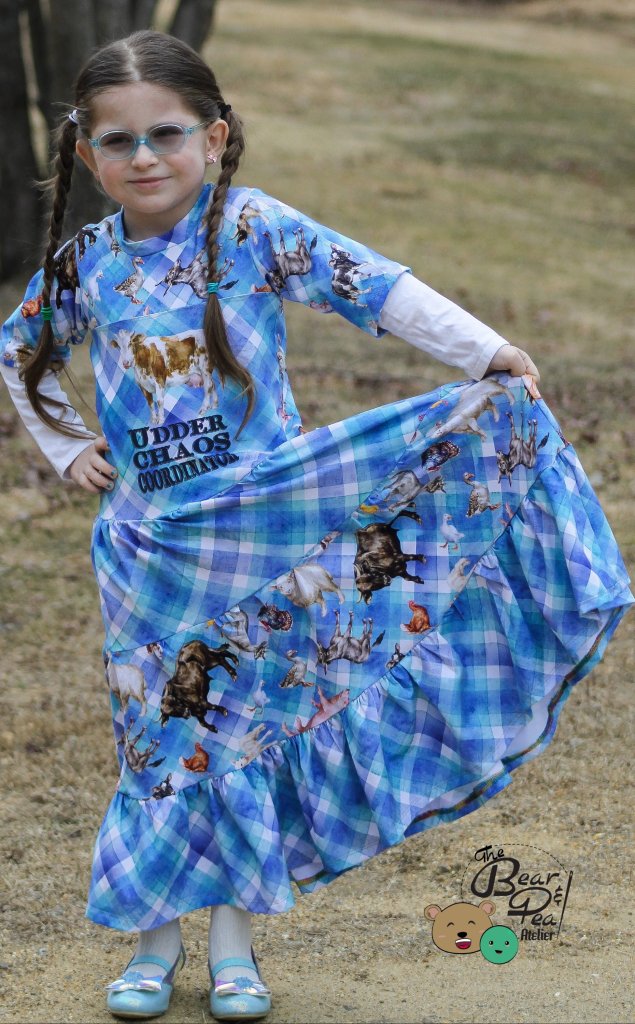
This year Sweet Pea asked for ALLLLLL the dresses. Which isn’t all that unusual for her, she loves dresses. She added she wanted length and twirly to the request.
So this means figuring out new patterns or even better, with all the uncertainty currently going on, digging through the depths of all my patterns and creating fun mash ups.
I decided to fill the request of the wee one I wanted to use bits and pieces of a couple different patterns from Goober Pea Designs Patterns to create a whole new look for her.
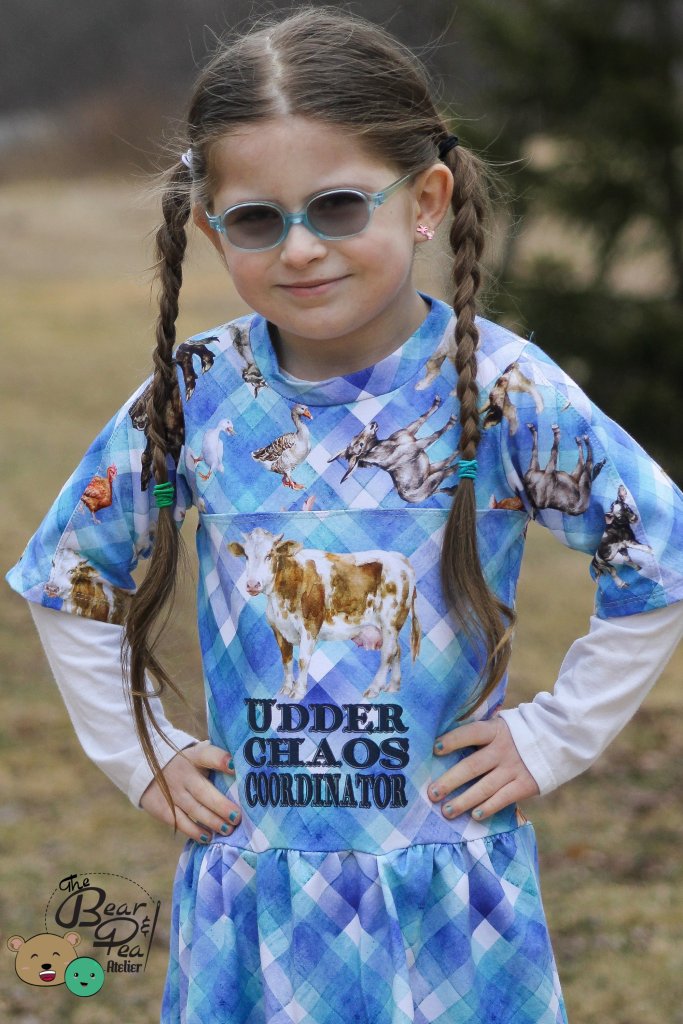
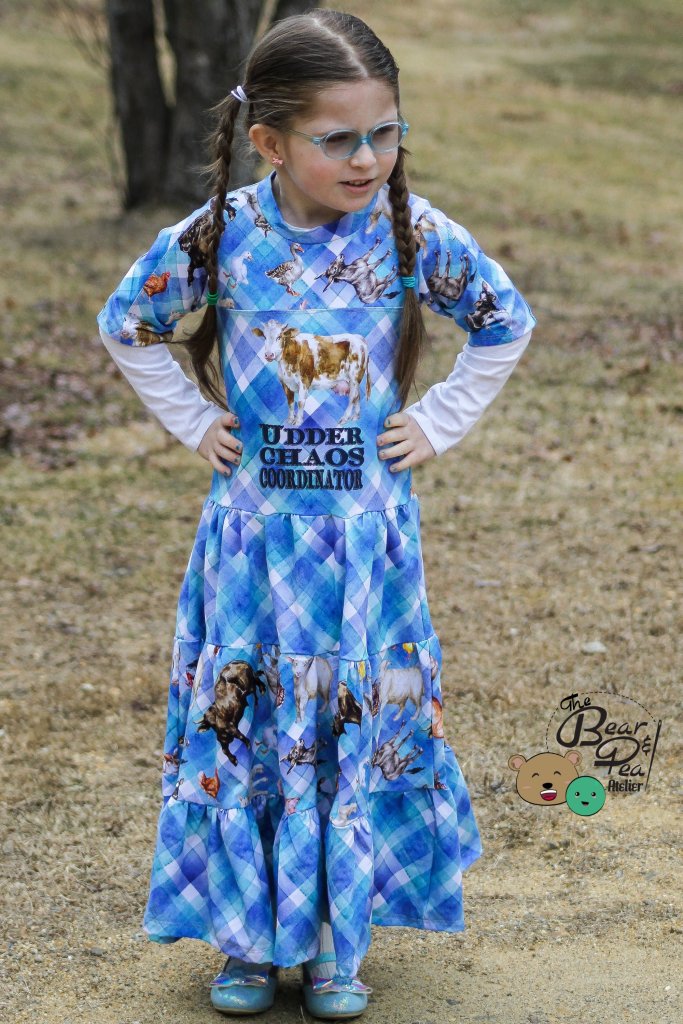
I got a super fun farm print from Shear Madness Fabrics and I knew I wanted something with colorblocking.
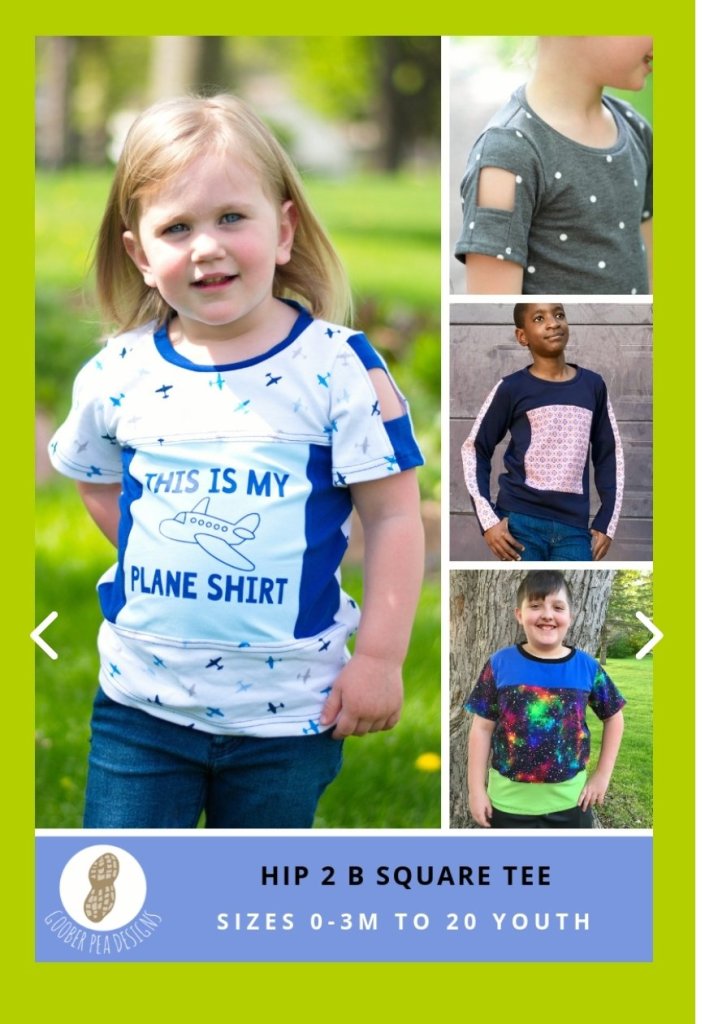
I started with the Hip 2 B Square tee which has a ton of features:
Youth sizing of 0-3mo to size 20
Basic Tee
Short and long sleeve options
Sleeve colorblocking with optional venting
Full or partial color blocking of the bodice
I opted for the short sleeve (Sweet Pea is not a fan of long and it would have been my preference due to the time of year but she was having none of that) with colorblocking of the sleeve and bodice. I left off the bottom colorblocking panel on the bodice and trued the back to match since I was attaching a skirt to the hemline. I also lengthened the sleeve a bit because Sweet Pea prefers elbow length sleeves.
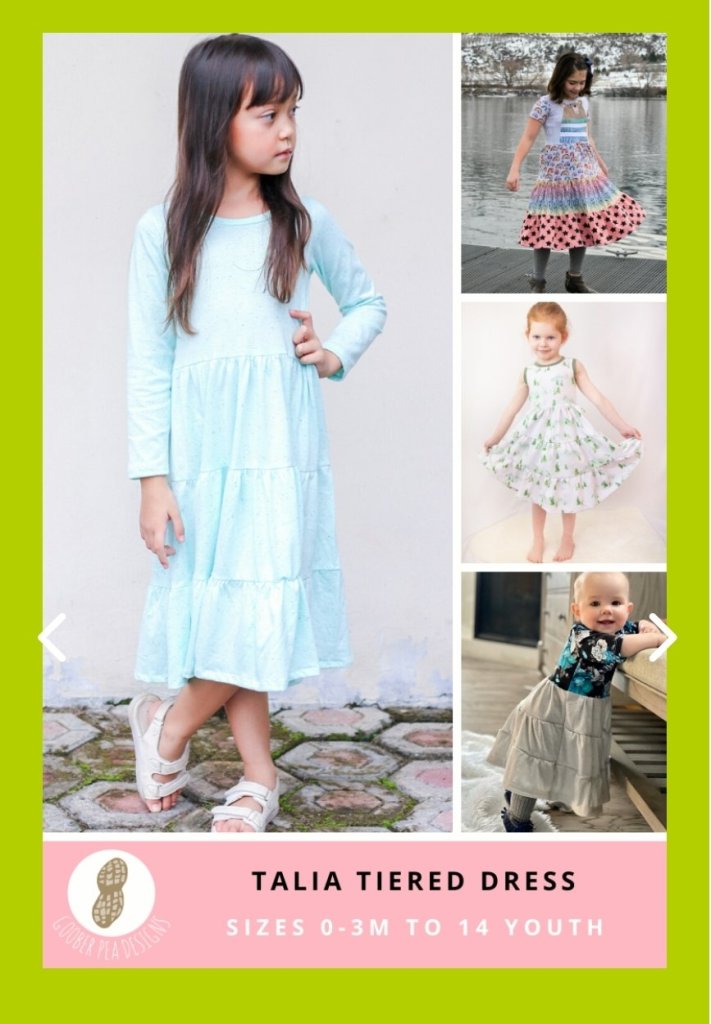
Next to work on the twirl factor and make a dress from the top. I could have gone with the Addison/Sadie add on pack that would have added a circle skirt but I knew with the request of maxi dress length it meant making an adjustment. So I decided to hack/mash it with the Talia Tiered Dress (which is free to newsletter subscribers.)
Talia has a few fun features:
Sizing from 0-3mo- size 14
Sleeveless, short sleeves, long sleeves
1,2 or 3 tiers to make peplum, tunic or dress length
Since the 3 tiers puts the dress at close to a tea length, I knew it would be easy to add a 1.5 inches to each tier to get close to ankle length. It was soo much gathering. I also added clear elastic when attaching the skirt because I was worried about the weight of the skirts with the added length.
She literally wore this dress for a week straight once it came off the machine so I would say this ended up being a successful mash up!
Welcome to the Spring Fling Blog Hop!
Sew Much Charm kicked off the Spring Fling with the Spring Fling Giveaway! A huge congratulations to the winners: Lorna P. of England & Patti V. of Texas! Each prize package had a retail value of $191!
Let’s keep the fun rolling this week with more sewing and more fun. Sew Much Charm is now also hosting the Spring Fling Blog Hop and I’m going to introduce to you our Bloggers for the Blog Hop!
Be sure to check each day by 6AM (Central Standard Time)! Each day there will be a blogger (or more) doing a giveaway! So be sure to check each blog post & just comment on their blog post from this blog hop and you are entered to win!
It’s that time of year when we start working on holiday gift ideas. I really love including at least one handmade gift for my children so this year I am making several gifts from the Winter Wear Designs 12 Days freebie items to figure out what I actually want to make.
This post I am all about the stocking stuffers and small gifts that won’t take very long for last minute gifts….
I wanted to work on a variety of projects that will free me up from last minute rushing that seems to always happen at the beginning of winter break. I listed my projects in order of published dates but I worked on them 20 minutes here and there over a few days.
The Animal Scarf: I really love this pattern. It is super cute and quick (except for trying to decide which features to give the critter you pick.) I went with knit for the accent pieces because Sweet Pea wanted her unicorn scarf to be a rainbow unicorn. I also used minky which while it created a plush cuddly scarf, its quite fiddly and I would recommend gluing the seams so they don’t slip or shift. I love the length for child size so I know for the few adults I’m gifting these to, they’ll be a great length. The knit fabric is from TKB Prints.
This project took the longest out of all the projects I made. It took me roughly an hour because of the choices that Sweet Pea chose.
The Wine Bottle Gift Bag: This is a gift that will be paired with a spiced holiday wine called gluhwein in a gift pack. This freebie has htv files so you can decorate with some fun sayings, take a look below.
Or you could go with a fun or funky fabric for something a bit more playful like I did.
This sew took 15 minutes and that’s only because I had to change my sewing feet to create a button hole. If you opted for tying the ribbon around the neck instead of making a casing for the ribbon, this project would take just a few minutes.
Alpine fingerless gloves: This pair specifically was sewn for the little Sweet Pea who is a children’s size 3/4 in width and 5 for length on things. The Alpine gloves begin at childrens 8-12. Since she is just outside of the range and the seam allowance is 1/4 inch, I know doubling the seam allowance would decrease the sizing over all by 1 inch and would probably work. I did have to rework the construction a bit because the sizing was so small. I started with sewing the thumb seam (using the 1/2 inch seam allowance instead of the original 1/4 inch one.) Next, I hemmed the thumb and finger holes. I then sewed up the side with the thumb hole with a 1/2 inch seam allowance, hemmed the bottom and finished with sewing up the last seam with the same 1/2 inch allowance.
This project took me 20 minutes start to finish even with changing the construction for the smaller size.
Christmas Cactus: This was a freebie was a bit more time consuming. In 35 minutes, I made these 4. I did not use full felt because I had a fun fat quarter of Christmas lights fabric and thought it might make the cactus look decorated. So I chose to use fray check on woven edges and backed with felt. I also used Pellon EZ5S Easy Steam Fusible Webbing to bind everything together prior to stitching. The bulk of the time I spent on these was the detail stitching, you could skip it (as well as stick with felt or fleece fabrics) and this would make a 20 minute or so project giving you 4 small gifts. These will go on containers of chex mix with tags for the kiddos teachers.
Earbud case: This was a super quick sew. I knocked 2 in about 20 minutes. I will eventually make 12 more for friendship gifts for the kids and wanted to try both the snap and the zipper to see the kids’ preferences for their friends. The beautiful Chibi Sailor Moon cats is a current preorder from Cosmic Fabric Creations. This preorder includes Sailor Moon, the Valentine Glitter hearts I showed off in the last blog I did and coming soon Baby Kevin. This project also comes with HTV emoji faces to decorate and has the button, zipper and snap options plus a hanging or wrist strap option.
The Hipster pack: This one might be my favorite gift so far. The pattern is straight forward and easy to follow. Typically, I muslin everything but went straight into using a beautiful hand dyed knit from Over the Selvage that is a current open preorder. The fabrics in this round are all designed to be dyed, colored or painted. I really don’t want to give this gift up because it is amazing.
This project took me roughly 30 minutes.
So there we go, half of our handmade Christmas gifts are all done! Which freebie do you like best?
I was really love One Thimble Magazine. So I was gobsmacked when a call for a blog tour came out and I got to apply for it and I was accepted to create a post. I feel like One Thimble does a great job getting designers that create designs that work for my little Sweet Pea.
I opted to start out with the Oceaan Shorts from The Eli Monster because I had lots of successs with the Neuix Tunic and Reizen pants (and Sweet Pea really wanted a new pair of shorts), you can see my notes on those patterns here–> Sew Fab Blog Tour. Sweet Pea settled on this lovely fabric from Cosmic Fabric Creations.
And off I went. As usual, the instructions have been amazing and we really love the button deals.
It was 6° outside so we had to go for an indoor photo shoot and still needed sweatshirts and tights.
I also got to sign up for the as Gentleman’s Polo which (yes, I made for my sweet girl) from Orange Daisy Patterns. I have never used any of this designer’s patterns and was hoping Sweet Pea would pick the long sleeved version. She opted for the midsleeve length, which is not a length we usually go for but I really like how it comes all the way down to the elbow. The placket construction was slightly different than I was used to but was quite easy to follow. We used the skirt from the Hickory & Spice Henley and colorblocking on the shoulders because Lolli was insistant upon it. The collar fit on the pattern quite nicely and I was quite proud to get nice sharp points, though I realize now after looking at the photos Lolli tucked the collar in so you can’t even see them🤦♀️
I’ll need to update with some more photos in a day or 2 to show off the really lovely collar. I really enjoyed the chance to work on this blog tour, get to discover a new designer and create fun stuff for my daughter to wear!
For your chance to win a copy of the new One Thimble Issue 22 – Summer 2019 please enter the rafflecopter prize draw here.Open until 12am Wednesday November 20th AEST
I love fall. It’s my favorite time of year. Here in New England the cool temperatures lend itself super well to layers. And since I have kiddos it frequently means my sewing is all about filling in their wardrobes!
This year Sweet Pea has been very specific about her likes and dislikes when it comes to clothing so we frequently have to scour pinterest to find styles for her with an overall look then try to replicate pieces of the look with adding fun custom pieces.
She has been super big on the patterned jacket look and I have to say I fully support that! Her favorite picture she keeps going back to is this one below. I knew immediately I wanted to revisit the Phresh Blazer but go with the regular sleeve and no ruffle design.
I got some really amazing fabric to work with from Cosmic Fabric Creations (House Owls are currently on preorder until November 7th and Jennifer has all your houses covered.) If you want more updates on this round check out Cosmic Fabrics Facebook group to stay up to date!
I knew this fabric was destined to be a part of the pin-spiration look I was going to go with and would be the perfect layering piece!
Size made: 6, chosen to be able to layer sweatshirts as winter comes and heavier layers are necessary.
As I’ve made this pattern several times (I think we have 4 Phresh blazers), I won’t go into a review of the pattern because we love it in this house. But I will say this is the first time I made a plain version (every other one has puffed sleeves and or ruffles.) And I am no less smitten by it as I was the first time I made one (you can check out my original post here where I talk about hacking the Phresh Jegging pattern too.)
These photos were taken “hot off the pressing table.” I think Sweet Pea did a great job picking her accompanying items to look like her pin board.
Check back with me on Friday to see how this jacket does double duty with a fun new dress😊
It’s the end of the summer, and the kids are finally back in school- yay! And most of us that sew are starting to shift our focus sewing on Halloween costumes and Christmas gifts.
This year rounding out the summer sewing for me are a variety of capsule style items that can be used with layering pieces. Sweet Pea loves dresses so long sleeve bodysuits and skirts that are longer and paired with leggings and leg warmers underneath allow her to still feel like a princess but be fully covered.
This year I decided I want to do a series of photos of Sweet Pea embodying different types of Goddesses and fairies. And I knew this was the perfect opportunity to start that series. As we go into fall my inspiration uses beautiful dark rainbow watercolor fabric from Cosmic Fabric Creations.
We sat down with some croquis and tried to figure out what would fit the guidelines for the end of the summer- it needed to have sleeves yet still work for layering, otherwise as we are going into very long months of cool weather there would be very little wear of a fabric Sweet Pea absolutely adores.
In the end this is what my daughter decided on.
I started with picking out the green so I knew what kind of body suit to go with. In the end Sweet Pea chose a muted green which was perfect for the new Logan Bodysuit from Rad Patterns. This is a snap crotch lapped bodysuit going from newborn sizing all the way up to a size 20+ in childrens (plans for an adult version are in the works currently.) It is part of the accessibility line that Rad Patterns offers. And it is currently on sale so get it before it goes to regular price.
I love it because the fit is amazing (I graded between a size 3t width and 5t length and I imagine I will have to make several more to go under overalls, dresses and skirts. And when she wears skirts and dresses we can leave off the bloomers and she can get in and out of it on her own to use the bathroom.
After that it was on to the skirt using that beautiful fabric above. The Kaleo Skirt from Eunoia patterns seems like a perfect fit. Since it had lots of gathers and was long like a princess skirt. Now Sweet Pea has a beautiful princess dress to wear for school fall music concerts and for when she just wants to be a princess. The Kaleo has excellent drafted instructions and since the skirt pieces are rectangles, offers both pattern pieces and a cut chart. The pattern also includes a slim cut top that can either be a crop or long and have short or 3/4 sleeve. I would have used it since it came with the pattern but Sweet Pea wanted something that would stay tucked in while playing.
She added a paper flower crown and I think she looks like a woodland fairy or Goddess and I feel like this looks almost exactly like the croquis above😍
We’re kicking off the Sew Long Summer blog tour this week. We have some really fun and inspiring creations for you again this year.
Sew Long Summer is all about getting those transitional wardrobe pieces ready; finishing up all those things we meant to make this summer; and well, basically whatever Sew Long Summer means to you.
This year again I will be using a sponsor’s pattern the Rosemary Crop Top from Phat Quarters***. It’s an adorable pattern that will see us through the winter to spring as well as the fall transitions in New England.
I chose the pattern because of it’s versatility. It offers 3 collar types, 2 different lengths and sleeves and is reversible. Sizing rund 2t-12 so my daughter has plenty of time to enjoy the pattern.
The sizing on this pattern is a little more generous on the height side than some of the other brands I have sewn for my daughter. Which will be very nice for her long torso, I typically have to add 2-3 inches because she’s so long!
Since this was a first time for me with both the designer and the pattern, I opted for the reversible crop with simple collar and cuffs.
The pattern is well written and I found a new technique in the instructions for creating the ability to be reversible, I love when a pattern teaches me new techniques. And I really loved being able to sew and complete a project during an episode of Hells Kitchen, so that makes it a great sew for a quick gift or instant gratification sew.
It’s a perfect sew for the upcoming spring where weather can be unpredictable in New England. And I am very excited about checking out more patterns at Phat Quarters!
Welcome to the Breaking Ground Blog Tour 2019 hosted by mahlicadesigns. This year over 25 bloggers from around the world are joining together to break new ground by trying a pattern designer that is new to them, try new techniques, new styles, or whatever way they want to push themselves.
We’d love to see how you’re Breaking Ground this month. Share with us what you’re working on by using the hashtag #BreakingGround2019 across social media.
****I recieved this pattern for free to be able to write this post.
OOOHHH what a busy out of sorts month it has been! Finally my husband got to go back to work which means I end up with me time again. But then we had the polar vortex that happened and so my kids were out a school or had late starts to the day several times. And Sweet Pea has been sick off and on. But now that things are getting back to normal its time for my first blog tour of the year.
Suzanne Winter with Winter Wear Designs decided that this month she would focus her tour on plackets, I was very nervous about timing of taking on plackets because trying to sew in such chaos is complicated at best. I chose Hepburn Henley because I tend to wear lots of tunic length tops and as a mom, I have a tendency to buy and make for the kids over making for me.
I had never made a placket for a ladies top (I have installed many on skirts and made 1 henley for Baby Bear), but I am always happy to try something new with Suzanne’s patterns because they have such great instructions. This was my first time using this kind of rib knit too so this sew was an adventure all the way around.
Doesn’t that placket look pretty. I went with a tunic length with a v-neckline and 3/4 sleeve. As always, Suzanne did not disappoint on the instructions- there are multiple views for the actual placket installation, which I found very helpful. I really love how the top feels on and will be making more for me because this henley makes a perfect everyday top!


 It was 6° outside so we had to go for an indoor photo shoot and still needed sweatshirts and tights.
 The placket construction was slightly different than I was used to but was quite easy to follow. We used the skirt from the Hickory & Spice Henley and colorblocking on the shoulders because Lolli was insistant upon it. The collar fit on the pattern quite nicely and I was quite proud to get nice sharp points, though I realize now after looking at the photos Lolli tucked the collar in so you can’t even see them🤦♀️